Welcome to the third part of our GameSparks tutorial series. In parts one and two we have finished GameSparks configuration and this time we will focus on creating our client application in Unity.
Unity
Project Setup
Create a new project in Unity. Establish a folder structure (at this point you should have folders for at least Prefabs, Scripts, Scenes and Sprites). Import our assets package, which contains all needed sprites and fonts.
Reusable Code
We’ll occasionally use the singleton design pattern to easily obtain references to key objects. If you aren’t familiar with this pattern or generic classes in C#, see Singleton wikipedia page and Microsoft Generic Classes documentation page. Create a new Script called Singleton and paste in the following code:
public abstract class Singleton<T> : MonoBehaviour where T : MonoBehaviour
{
    public static T Instance { get; private set; }

    protected void Awake()
    {
        if (Instance == null)
        {
            Instance = this as T;
            DontDestroyOnLoad(gameObject);
        }
        else
        {
            Destroy(gameObject);
        }
    }
}
We’ll also create a class that will simplify scene transitions. It’s good to create your own wrappers for this type of behaviour and use them exclusively, so you can later add features (loading screen, fade in/out) without having to change the existing code. Create a new Script called LoadingManager and paste in the following code:
public class LoadingManager : Singleton<LoadingManager>
{
    public void LoadNextScene()
    {
        int activeSceneIndex = SceneManager.GetActiveScene().buildIndex;
        SceneManager.LoadScene(activeSceneIndex + 1);
    }

    public void LoadPreviousScene()
    {
        int activeSceneIndex = SceneManager.GetActiveScene().buildIndex;
        SceneManager.LoadScene(activeSceneIndex - 1);
    }
}
GameSparks SDK
Follow the instructions at the official documentation page to import and configure GameSparks SDK.
There aren’t any Unity settings required specifically for GameSparks, but it’s always a good idea to enable Run In Background checkbox in Player Settings. It’ll ensure that we’ll receive all Messages and Responses, even when the application is minimized or not focused.

Initial Scene Configuration
Create a Camera prefab to share its settings between the scenes.
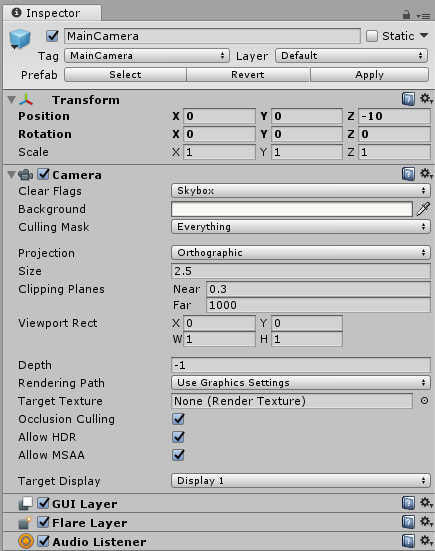
Create three new scenes: Login, MainMenu and Game. Make sure that each one has a Camera and a Canvas object. Add them to the build settings in the following order:

Create a new prefab called GameSparksManager. Add GameSparksUnity component to it and make sure to set a reference to the settings asset.
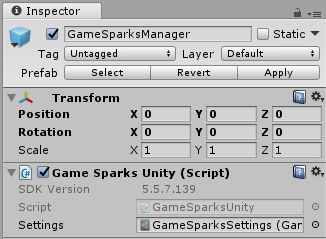
Then create a new script, called GameSparksSingleton. Add it to the GameSparksManager prefab. This will ensure that only one instance of GameSparksManager is present and it’s not destroyed after loading a new scene.
public class GameSparksSingleton : Singleton<GameSparksSingleton>
{
}
Add GameSparksManager prefab instance to the Login scene.
Authentication
Add two InputFields (username and password), two Buttons (login and register) and one Text (for error messages) to the Login scene. Make sure they are grouped under some RectTransform parent object and create a prefab.
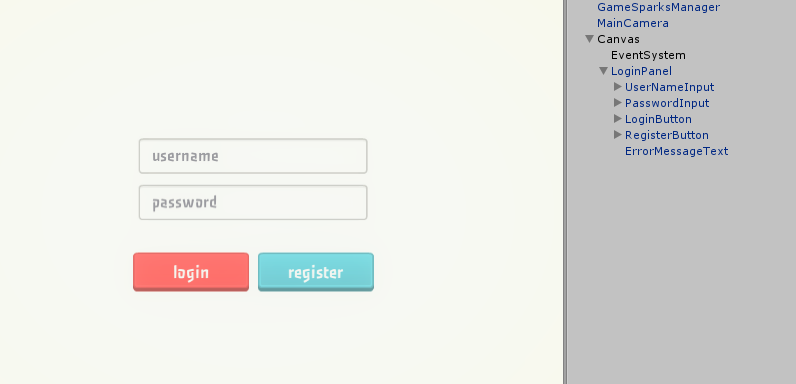
Create a new script called LoginPanel and add a LoginPanel component to the prefab. Add five UI reference fields to the LoginPanel. Assign them in the inspector.
public class LoginPanel : MonoBehaviour
{
    [SerializeField]
    private InputField userNameInput;
    [SerializeField]
    private InputField passwordInput;
    [SerializeField]
    private Button loginButton;
    [SerializeField]
    private Button registerButton;
    [SerializeField]
    private Text errorMessageText;
}
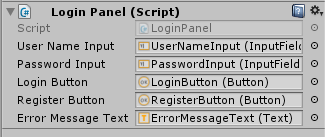
In Awake subscribe to the onClick events on both Buttons.
public class LoginPanel : MonoBehaviour
{

    // …

    void Awake()
    {
        loginButton.onClick.AddListener(Login);
        registerButton.onClick.AddListener(Register);
    }

    // …

}
Add Login and Register methods.
public class LoginPanel : MonoBehaviour
{

    // …

    private void Login()
    {
        AuthenticationRequest request = new AuthenticationRequest();
        request.SetUserName(userNameInput.text);
        request.SetPassword(passwordInput.text);
        request.Send(OnLoginSuccess, OnLoginError);
    }

    private void OnLoginSuccess(AuthenticationResponse response)
    {
        LoadingManager.Instance.LoadNextScene();
    }

    private void OnLoginError(AuthenticationResponse response)
    {
        errorMessageText.text = response.Errors.JSON.ToString();
    }

    private void Register()
    {
        RegistrationRequest request = new RegistrationRequest();
        request.SetUserName(userNameInput.text);
        request.SetDisplayName(userNameInput.text);
        request.SetPassword(passwordInput.text);
        request.Send(OnRegistrationSuccess, OnRegistrationError);
    }

    private void OnRegistrationSuccess(RegistrationResponse response)
    {
        Login();
    }

    private void OnRegistrationError(RegistrationResponse response)
    {
        errorMessageText.text = response.Errors.JSON.ToString();
    }

    // …

}
Each of them creates a Request object, fills in any needed data and sends it to GameSparks. When using Send method you pass two delegates (callbacks), which will respectively be called when the Request succeeds or fails. When registration succeeds, we want the login request to be carried out for us automatically.
Add input blocking and unblocking to make sure additional Requests aren’t sent before we receive a Response. Complete code for LoginPanel looks like this:
public class LoginPanel : MonoBehaviour
{
    [SerializeField]
    private InputField userNameInput;
    [SerializeField]
    private InputField passwordInput;
    [SerializeField]
    private Button loginButton;
    [SerializeField]
    private Button registerButton;
    [SerializeField]
    private Text errorMessageText;

    void Awake()
    {
        loginButton.onClick.AddListener(Login);
        registerButton.onClick.AddListener(Register);
    }

    private void Login()
    {
        BlockInput();
        AuthenticationRequest request = new AuthenticationRequest();
        request.SetUserName(userNameInput.text);
        request.SetPassword(passwordInput.text);
        request.Send(OnLoginSuccess, OnLoginError);
    }

    private void OnLoginSuccess(AuthenticationResponse response)
    {
        LoadingManager.Instance.LoadNextScene();
    }

    private void OnLoginError(AuthenticationResponse response)
    {
        UnblockInput();
        errorMessageText.text = response.Errors.JSON.ToString();
    }

    private void Register()
    {
        BlockInput();
        RegistrationRequest request = new RegistrationRequest();
        request.SetUserName(userNameInput.text);
        request.SetDisplayName(userNameInput.text);
        request.SetPassword(passwordInput.text);
        request.Send(OnRegistrationSuccess, OnRegistrationError);
    }

    private void OnRegistrationSuccess(RegistrationResponse response)
    {
        Login();
    }

    private void OnRegistrationError(RegistrationResponse response)
    {
        UnblockInput();
        errorMessageText.text = response.Errors.JSON.ToString();
    }

    private void BlockInput()
    {
        userNameInput.interactable = false;
        passwordInput.interactable = false;
        loginButton.interactable = false;
        registerButton.interactable = false;
    }

    private void UnblockInput()
    {
        userNameInput.interactable = true;
        passwordInput.interactable = true;
        loginButton.interactable = true;
        registerButton.interactable = true;
    }
}
Matchmaking
In this tutorial the MainMenu scene has only two purposes – to send a MatchmakingRequest when Play button is clicked and to await a ChallengeStartedMessage, which will be sent after players are matched and a Challenge is created on the backend.
Create a new, empty panel on the MainMenu scene’s Canvas. Call it MainMenuPanel or similarly. Add a Button to it.
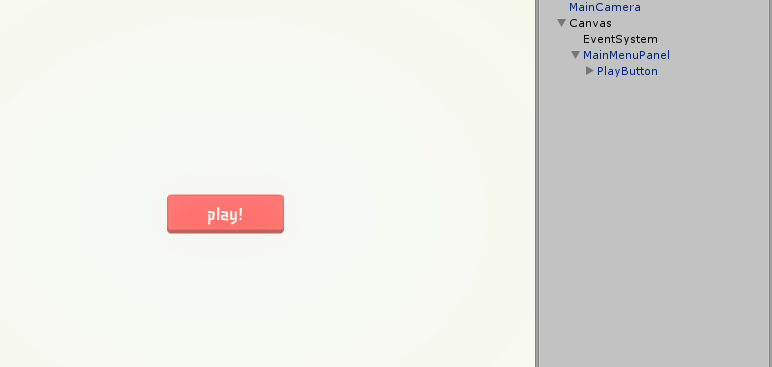
Create a new script called MainMenuPanel and add it to the previously created object. Save it as a prefab. Inside the script add a reference to the Button and assign it in the inspector.
public class MainMenuPanel : MonoBehaviour
{
    [SerializeField]
    private Button playButton;
}
In Awake subscribe to the onClick event on the button.
public class MainMenuPanel : MonoBehaviour
{

    // …

    void Awake()
    {
        playButton.onClick.AddListener(Play);
    }

    // …

}
Add Play method.
public class MainMenuPanel : MonoBehaviour
{

    // …

    private void Play()
    {
        MatchmakingRequest request = new MatchmakingRequest();
        request.SetMatchShortCode("DefaultMatch");
        request.SetSkill(0);
        request.Send(OnMatchmakingSuccess, OnMatchmakingError);
    }

    private void OnMatchmakingSuccess(MatchmakingResponse response)
    {
    }

    private void OnMatchmakingError(MatchmakingResponse response)
    {
    }

    // …

}
Inside Play we create a MatchmakingRequest object, fill in any needed data and send it to GameSparks.
Now we need to intercept the ChallengeStartedMessage and when it is received, proceed to the Game scene. We also subscribe to the MatchNotFoundMessage, which will be sent when no match is found in available time.
public class MainMenuPanel : MonoBehaviour
{

    // …

    void Awake()
    {
        playButton.onClick.AddListener(Play);
        MatchNotFoundMessage.Listener += OnMatchNotFound;
        ChallengeStartedMessage.Listener += OnChallengeStarted;
    }

    void OnDestroy()
    {
        ChallengeStartedMessage.Listener -= OnChallengeStarted;
    }

    private void OnMatchNotFound(MatchNotFoundMessage message)
    {
    }

    private void OnChallengeStarted(ChallengeStartedMessage message)
    {
        LoadingManager.Instance.LoadNextScene();
    }

    // …

}
Add input blocking and unblocking to make sure we only queue for the matchmaking once. Complete code for MainMenuPanel looks like this:
public class MainMenuPanel : MonoBehaviour
{
    [SerializeField]
    private Button playButton;

    void Awake()
    {
        playButton.onClick.AddListener(Play);
        MatchNotFoundMessage.Listener += OnMatchNotFound;
        ChallengeStartedMessage.Listener += OnChallengeStarted;
    }

    void OnDestroy()
    {
        ChallengeStartedMessage.Listener -= OnChallengeStarted;
    }

    private void Play()
    {
        BlockInput();
        MatchmakingRequest request = new MatchmakingRequest();
        request.SetMatchShortCode("DefaultMatch");
        request.SetSkill(0);
        request.Send(OnMatchmakingSuccess, OnMatchmakingError);
    }

    private void OnMatchmakingSuccess(MatchmakingResponse response)
    {
    }

    private void OnMatchmakingError(MatchmakingResponse response)
    {
        UnblockInput();
    }

    private void OnMatchNotFound(MatchNotFoundMessage message)
    {
        UnblockInput();
    }

    private void OnChallengeStarted(ChallengeStartedMessage message)
    {
        LoadingManager.Instance.LoadNextScene();
    }

    private void BlockInput()
    {
        playButton.interactable = false;
    }

    private void UnblockInput()
    {
        playButton.interactable = true;
    }
}
Summary
Now we have a fully functional matchmaking in our Unity client. In the final, fourth part of the tutorial we’ll show you how to set up the Game scene, send Move Events and implement the win conditions.
