
In the previous part of this tutorial we’ve covered GameSparks basic concepts, including the configuration of matchmaking and setting up the Challenges. Today we will further explore the Cloud Code and implement our server-side game logic.
As you probably remember, Cloud Code is essentially JavaScript and most of the good practices translate well if you have used JavaScript before.
Game Logic Cloud Code
Start out with creating a new GameSparks module, which is a script that you can later use in any other Cloud Code scripts.
There are many ways to structure your code in JavaScript, but we’ll present how to use the module design pattern (don’t confuse with a GameSparks module) to create a board object.
Module design pattern uses closures to encapsulate private fields of the object, only exposing a public interface. If you don’t come from a JavaScript background, and you’ve used classical object oriented programming languages so far, this might be confusing. If you want to improve your understanding of JavaScript concepts later, I recommend reading a book called JavaScript: The Good Parts.
The board will be represented by a flattened, two-dimensional array of fields. Every element will be a number of the piece on that field. 0 is an empty field, 1 is a piece owned by player one, and 2 is a piece owned by player two. This is the only thing that will be persistently stored in the Challenge data as JSON and sent to the Unity client.
First create a new module and call it Board.

Inside define three constants, representing piece types.
const EMPTY_PIECE = 0;
const HEARTS_PIECE = 1;
const SKULLS_PIECE = 2;
Now define createBoard function which creates and returns a new object.
var createBoard = function(challengeID) {
    return {};
};
In JavaScript you can nest functions inside other functions. You can use it to your advantage. Inside createBoard you can define any number of variables. Thanks to the closure they will be accessible by all inner functions, but will be inaccessible from the outside. Add fields variable, which we’ll use to store the board representation, as well as some constants which will come in handy later.
var createBoard = function(challengeID) {

    const BOARD_SIZE = 15;
    const CONSECUTIVE_PIECES_NEEDED = 5;
    const FIELDS_DATA_NAME = "fields";
    var fields;

    // …

};
Add getField and setField helper functions to calculate the index and retrieve the piece at position (x, y).
var createBoard = function(challengeID) {

    // …

    var getField = function(x, y) {
        var index = x + y * BOARD_SIZE;
        return fields[index];
    };

    var setField = function(x, y, piece) {
        var index = x + y * BOARD_SIZE;
        fields[index] = piece;
    };

    // …

};
Board Initialization
Before being able to use the fields array we need to initialize it with empty fields. Add initialize, createFields and save functions and call initialize just before the return statement.
var createBoard = function(challengeID) {

    // …

    var initialize = function() {
        var challenge = Spark.getChallenge(challengeID);
        fields = challenge.getScriptData(FIELDS_DATA_NAME);
        if (fields === null) {
            createFields();
            saveFields();
        }
    };

    var createFields = function() {
        fields = [];
        var fieldCount = BOARD_SIZE * BOARD_SIZE;
        for (var i = 0; i < fieldCount ; i++) {
            fields.push(EMPTY_PIECE);
        }
    };

    var saveFields = function() {
        var challenge = Spark.getChallenge(challengeID);
        challenge.setScriptData(FIELDS_DATA_NAME, fields);
    };

    initialize();
    return {};
};
Each created Challenge object is serialized and stored in a NoSQL database. You can append your custom data using setScriptData function. You can later retrieve that data with the use of getScriptData function. Since our board object will be recreated every time the Cloud Code is being executed, we need to check if the fields array has been already created for this challenge. If not, it has to be created and saved to the script data.
Move Logic
Add tryMove function along with its helper isPositionValid. We want to expose both functions as public, so let’s also add references to them in the returned object.
var createBoard = function(challengeID) {

    // …

    var tryMove = function(x, y, piece) {
        if (isPositionValid(x, y) && getField(x, y) === EMPTY_PIECE) {
            setField(x, y, piece);
            saveFields();
            return true;
        }
        else {
            return false;
        }
    };

    var isPositionValid = function(x, y) {
        return x >= 0 && x < BOARD_SIZE && y >= 0 && y < BOARD_SIZE;
    };

    // …

    return {
        tryMove : tryMove,
        isPositionValid : isPositionValid
    };
};
tryMove function will return true or false, depending on whether the move was valid or not.
Win Conditions
Last thing we need in the public interface is a function that checks for win conditions. We can simplify the problem by correctly assuming that a winning chain always contains a piece put on the board during the last move. This way we don’t have to check every horizontal, vertical and diagonal.
All our checks will use countRecursivelyInDirection function.
var createBoard = function(challengeID) {

    //…

    var countRecursivelyInDirection = function(x, y, xDelta, yDelta, originalPiece) {
        var newX = x + xDelta;
        var newY = y + yDelta;
        if (isPositionValid(newX, newY) && getField(newX, newY) === originalPiece) {
            return 1 + countRecursivelyInDirection(newX, newY, xDelta, yDelta, originalPiece)
        }
        else {
            return 0;
        }
    };

    //…

};
It is a function meant to be used recursively. xDelta and yDelta parameters indicate a direction in which the next piece is checked. If it is a different piece, the counting stops, as the chain is broken there. If it is the same piece as the original one, the counter is incremented and the next field is checked in the same direction recursively.
Now we just need to add functions that check for winning chains in all possible directions, starting at given coordinates. Add checkWinConditions function along with its helpers: checkHorizontal, checkVertical, checkFirstDiagonal and checkSecondDiagonal. Don’t forget to add checkWinConditions to the public interface and save the GameSparks module.
var createBoard = function(challengeID) {

    // …

    var checkWinConditions = function(x, y) {
        var originalPiece = getField(x, y);
        return checkHorizontal(x, y, originalPiece) || checkVertical(x, y, originalPiece) || checkFirstDiagonal(x, y, originalPiece) || checkSecondDiagonal(x, y, originalPiece);
    };

    var checkHorizontal = function(x, y, originalPiece) {
        var consecutivePieces = 1 + countRecursivelyInDirection(x, y, -1, 0, originalPiece) + countRecursivelyInDirection(x, y, 1, 0, originalPiece);
        return consecutivePieces === CONSECUTIVE_PIECES_NEEDED;
    };

    var checkVertical = function(x, y, originalPiece) {
        var consecutivePieces = 1 + countRecursivelyInDirection(x, y, 0, -1, originalPiece) + countRecursivelyInDirection(x, y, 0, 1, originalPiece);
        return consecutivePieces === CONSECUTIVE_PIECES_NEEDED;
    };

    var checkFirstDiagonal = function(x, y, originalPiece) {
        var consecutivePieces = 1 + countRecursivelyInDirection(x, y, -1, 1, originalPiece) + countRecursivelyInDirection(x, y, 1, -1, originalPiece);
        return consecutivePieces === CONSECUTIVE_PIECES_NEEDED;
    };

    var checkSecondDiagonal = function(x, y, originalPiece) {
        var consecutivePieces = 1 + countRecursivelyInDirection(x, y, -1, -1, originalPiece) + countRecursivelyInDirection(x, y, 1, 1, originalPiece);
        return consecutivePieces === CONSECUTIVE_PIECES_NEEDED;
    };

    // …

    return {
        tryMove : tryMove,
        isPositionValid : isPositionValid,
        checkWinConditions : checkWinConditions
    };
};
Add following code to GlobalMessages/ChallengeStartedMessage:
require("Board");

// Initialize the board so the fields array will be sent with ChallengeStartedMessage.
var challengeID = Spark.getData().challenge.challengeId;
var board = createBoard(challengeID);
Move Challenge Event
It’s time to use your newly created Board module. First let’s create an Event that will be sent by players when they make a move.
Go to Configurator/Events and click Add button. Fill in the form as shown in the image below, adding two Attributes which will be X and Y coordinates of the move.
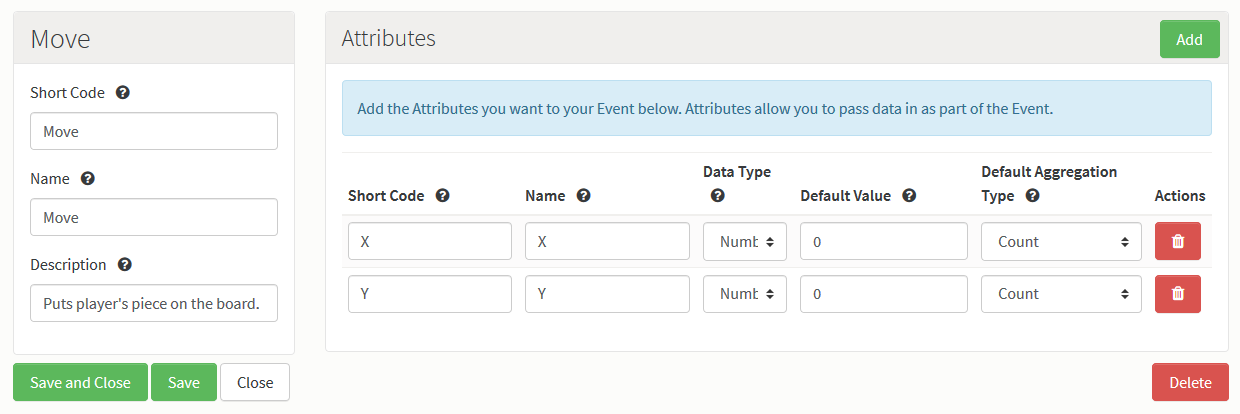
Click ‘Save and Close’ button.
Go to Configurator/CloudCode. Move event makes sense only in a context of a Challenge, and we need a reference to that Challenge, so we could access its script data. That’s why we need to use a Challenge Event interceptor. Select ChallengeEvents/Move which corresponds to the Event you have just created.

Paste in the following code:
require("Board");

var challengeID = Spark.getData().challengeInstanceId;
var challenge = Spark.getChallenge(challengeID);
var player = Spark.getPlayer();
var playerID = player.playerId;
var x = Spark.getData().X;
var y = Spark.getData().Y;

var board = createBoard(challengeID);
var piece = challenge.getChallengerId() === playerID ? HEARTS_PIECE : SKULLS_PIECE;
if (board.tryMove(x, y, piece)) {
    challenge.takeTurn(playerID);
    if (board.checkWinConditions(x, y)) {
        challenge.winChallenge(player);
    }
}
First line allows us to use the previously created Board module in this script. Any needed Request data is retrieved from the Sparks object. After that, we create a board object and try to put a piece on the board. If the move was successful, player’s turn is consumed and all players receive a ChallengeTurnTakenMessage. Then we check for win conditions. After the Challenge is won, the winner is sent a ChallengeWonMessage and the loser is sent a ChallengeLostMessage.
Testing
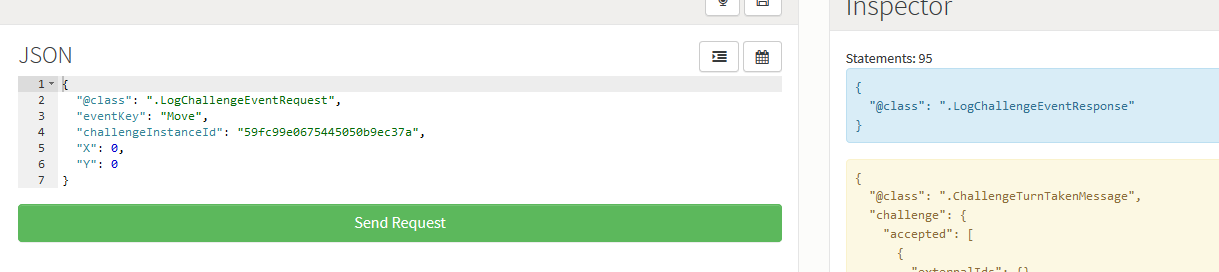
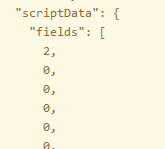
Open the Test Harness, authenticate two players and find a match to create a Challenge as before. Then try to send a LogChallengeEvent (Move) request. One of the players will be unable to do this (one cannot move if it’s not his or her turn). The other one should be able to affect the fields array in the script data.

Summary
This concludes the GameSparks part of this tutorial. You can already play the game using the Test Harness, however, it might be difficult to see how the board looks in two dimensions. In the next part we’ll create a new Unity project and set up authentication and matchmaking scenes, in preparation for the final part of the tutorial in which we’ll implement the gameplay.