In this tutorial we’ll introduce GameSparks platform and we’ll teach you how to build a simple turn-based multiplayer game inspired by a classic Gomoku, under a working title ‘Hearts and Skulls’.
Instructions will be mostly focusing on integrating GameSparks and Unity. We’ll explain some GameSparks basics, but previous Unity knowledge is required (on an intermediate level).
In this tutorial we’ve been using 2017.1.1f1 version of Unity, but any of Unity 5 or 2017 (previous or future releases) versions should work.
Before we get started, you can check out the final result and play our live demo (run it in two separate browser tabs if you can’t find a multiplayer match). After you have an idea about what the finished application looks like, download all Unity assets (sprites and fonts) we’ll be using. If you need more details about how everything is set up in Unity, download the complete project.
Rules of Gomoku
Gomoku, also known as Five in a Row, is a strategy board game for two players. Gomoku boards come in various sizes, but we’ll use one that is 15×15. Players take turns in which they place one of their pieces on one of the empty fields on the board. The goal is to form a consecutive chain of five pieces (no less, no more) either horizontally, vertically or diagonally.
Additional tournament rules can be added to the game to minimize the first-move advantage but we’ll start out with the simplest variant.
You can find more information about Gomoku and some strategy tips at GomokuWorld.
GameSparks
Introduction to GameSparks
GameSparks is a cloud service which offers almost everything you might need for your game when it comes to backend solutions. Among its many features are:
- User authentication
- Customizable matchmaking
- Turn-based or real time multiplayer
- Server authoritative Cloud Code (which is essentially JavaScript)
- Player data and game data storage
- Leaderboards and achievements
- Economy
- Analytics
… and many more. For a more complete list of features see GameSparks features description page.
GameSparks and the client app (in our case Unity) can communicate in a couple of ways.
- Client can send a Request. Many different premade Request types are available. In fact, you can create your own types, called Events.
- GameSparks can react to a Request, sending a Response. Sometimes, when things go wrong, this might be an error response.
- GameSparks can also independently send Messages to the client.
You can use interceptors to execute your custom server code (called Cloud Code) in interception points. There are four key interception points:
- After a Request is received but before it is processed. You can use it to execute a piece of code before GameSparks does its default processing for a given Request. You could, for example, use it for additional server-side validation.
- Before a Response is sent. Use it to execute a piece of code after GameSparks does its default processing for a given Request. You could for example retrieve some data and append it to the Response.
- After a Message is created. The same Message could be sent to multiple players. Using this interception point you can ensure that the code will only execute once per Message. This corresponds to GlobalMessages folder in Cloud Code Configurator panel. You could for example initialize your game state before a ChallengeStartedMessage is sent to the players (we’ll soon explain what Challenges are).
- Before a Message is sent. Use it to execute a piece of code for every player this Message is sent to. This corresponds to UserMessages folder in Cloud Code Configurator. You could for example append some data to the Message only one of the players should know about.
To learn more, see the diagrams at the official documentation page.
All communication with the service is done in the context of a user. Therefore, before your app can make any requests or receive messages you have to use one of the available authentication methods.
You can customize the matchmaking process in any way you want. Skill-based matchmaking is also very easy to implement. GameSparks uses Matches to find groups of players that meet given criteria. After a Match is found, a game or a room has to be created.
In GameSparks this can be achieved by using Challenges. Challenges, however, have a much broader application. You can use them for any activity that is performed by one or more players. They are fully customizable (this is outside of scope of this tutorial, though).
An important feature of GameSparks is the Test Harness. You can use it to fully test your game before launching it with the use of a GUI to send Requests, inspect the platform Responses and debug your Cloud Code.
We’ll further explore all of these concepts. To learn more you can always use the official documentation.
Account Setup
To create a GameSparks account, head to the registration page. After a successful login you will be able to create a new game configuration.
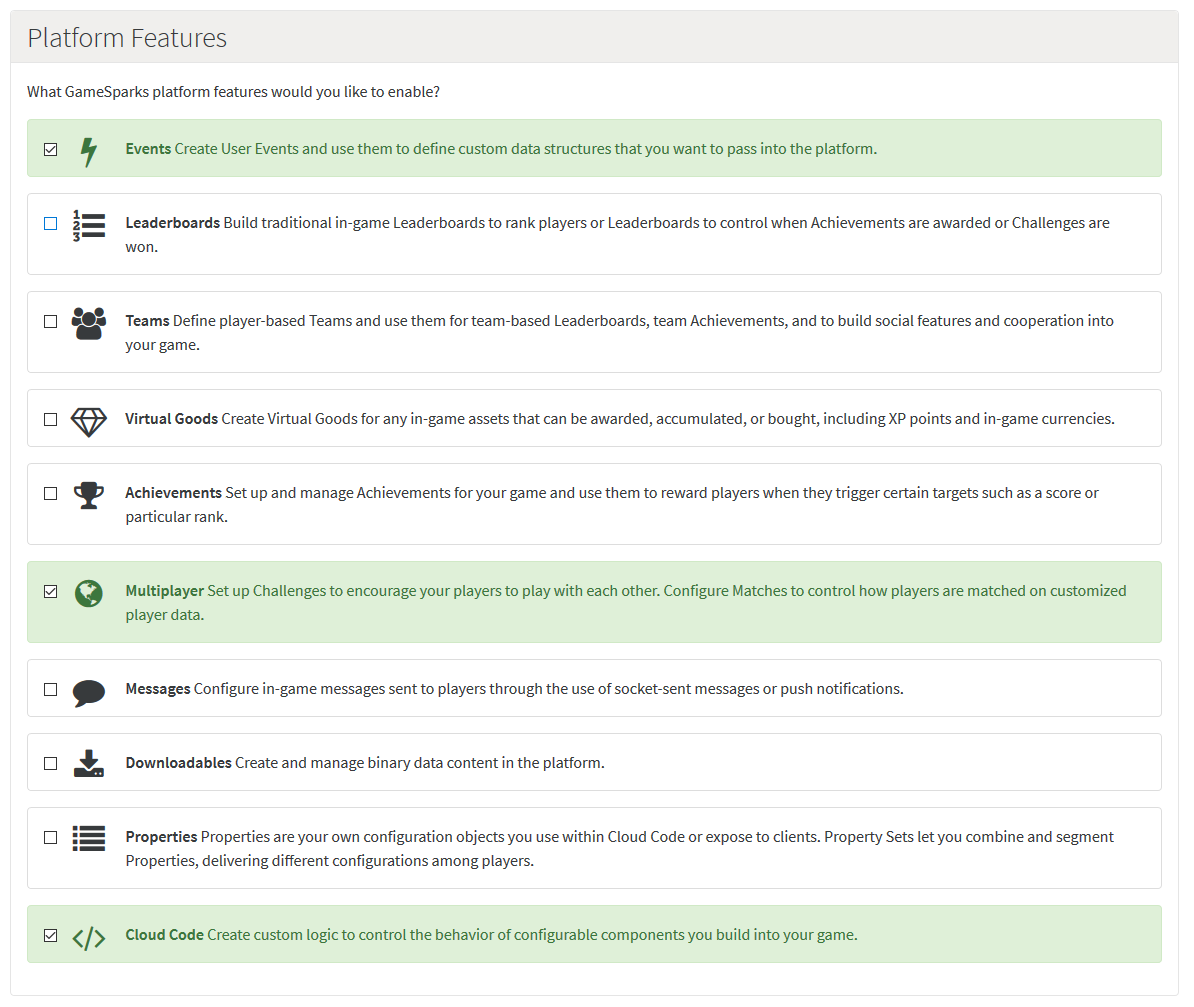
Documentation chapter available at the official documentation page explains how to create a new game. Follow the instructions. We won’t need any currencies set up at this moment. Enable following platform features: Events, Multiplayer, Cloud Code.
Authentication
GameSparks offers several authentication methods. We’ll use the simplest one which is username and password. Users have to register an account before being able to use it. We don’t have to configure anything on the GameSparks side to make it work.
Match and Challenge Setup
To be able to match our players we have to configure a Match first. Go to Configuration/Multiplayer. Select Matches tab and click the ‘Add’ button. Fill in the form as shown in the image below.
Each Match has to have at least one Threshold configured. Thresholds are used to fine-tune the search algorithm. You can set narrower or broader player skill requirements. You can also specify a period of time after which (if no match is found) the next Threshold will be used. If there are no more Thresholds, matchmaking will end with MatchNotFoundMessage.
To learn more about Thresholds visit the official documentation page. We won’t be using skill-based matchmaking yet, so we’ll just add one Threshold that matches players at any skill level.

Click ‘Save and Close’.
After two players are matched we need to create a Challenge for them (which in this case could be also called a room). To configure a Challenge, switch to Challenges tab and click the ‘Add’ button. Fill in the form as shown in the image below.
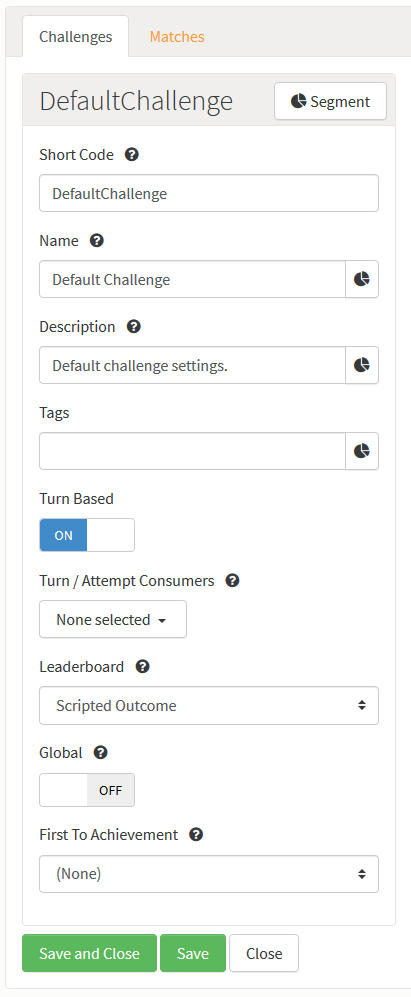
Click ‘Save and Close’.
GameSparks doesn’t automatically create a Challenge instance when players are matched. We have to write our own Cloud Code to create and automatically accept a Challenge. Go to Configurator/CloudCode, select UserMessages/MatchFoundMessage and open it.

This script will execute before MatchFoundMessage is sent to all of the interested players. Paste in the following code:
// First player in a match will be the challenger.
if (Spark.getPlayer().getPlayerId() === Spark.getData().participants[0].id) {
   var tomorrow = new Date();
   tomorrow.setDate(tomorrow.getDate() + 1);
   var request = new SparkRequests.CreateChallengeRequest();
   request.challengeShortCode = "DefaultChallenge";
   request.endTime = tomorrow.toISOString();
   request.usersToChallenge = Spark.getData().participants[1].id;
   request.Send();
}
We can obtain a lot of information about the match and the message context from the Spark object.
Now go to UserMessages/ChallengeIssuedMessage and open it.

This script will execute before ChallengeIssuedMessage is sent to the challenged player. Paste in the following code:
var request = new SparkRequests.AcceptChallengeRequest();
request.challengeInstanceId = Spark.getData().challenge.challengeId;
request.Send();
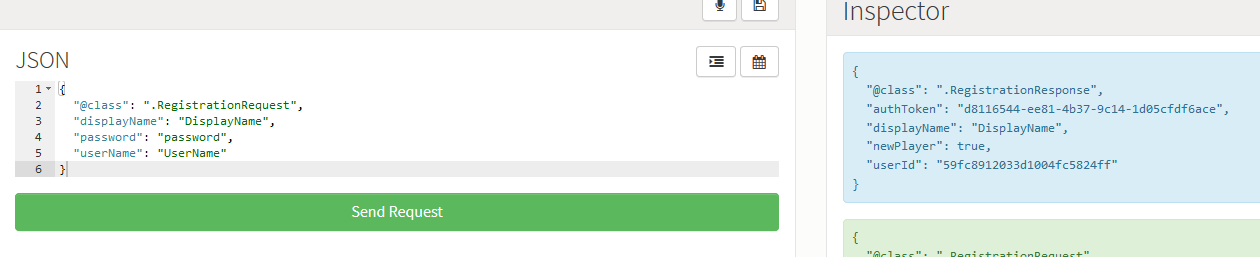
We can test our matchmaking process using the Test Harness. Open the Test Harness in two separate web browser windows. Send two RegistrationRequests to create two user accounts and then send an AuthenticationRequest from each browser window.

Now send a MatchmakingRequest from each browser window.
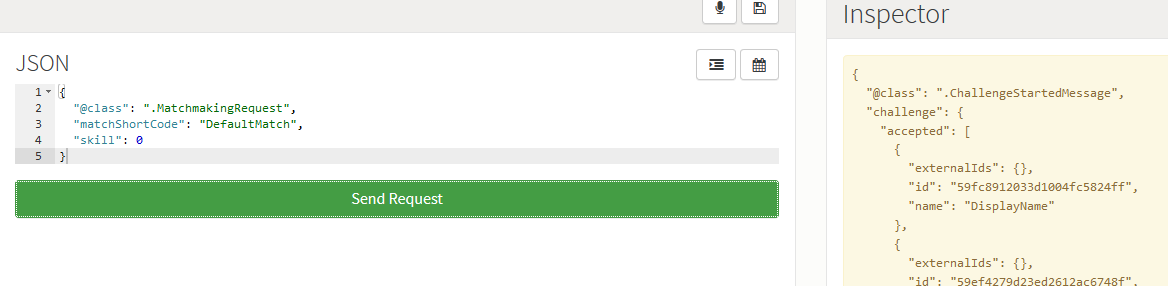
You should receive ChallengeStartedMessages in both browser windows.
Summary
So far we have learned how to create a new game configuration, match players and create a Challenge. In the next part of this tutorial we’ll start with implementing the game logic (using Cloud Code) and finish GameSparks configuration, so we could focus on building the Unity app in parts 3 and 4.