Unity Technologies is one of these companies that constantly bring something new to the table. Unity 2018.3 introduced a few new features that might come in handy in many scenarios, e.g. improved prefab workflow, nested prefabs, terrain updates, Nvidia PhysX upgrade to version 3.4 and much more to come, like support for Android App Bundles and C# 7 or garbage collector update. In this post however, we will mainly focus on two new features – ECS workflow and Project Tiny.
The Entity Component System (ECS)
Because Project Tiny relies on ECS, we will talk about the latter first. The Entity Component System is a model designed for writing high performance code. Its structure is completely different from the standard MonoBehaviour system – each program is divided into three parts:
- Components – responsible solely for storing data,
- Entities – elements combining Components into groups,
- Systems – containing all the logic responsible for controlling entities.
The ECS model allows us to easily modularize our projects, removing redundant overhead – because Entities are not GameObjects, but sets of components, they don’t require attaching components like Transform, which is handy when our object exists solely for logic purpose. Furthermore, even when we need to specify the position of our Entity, we don’t necessarily want to change its scale or rotation – with ECS we can specify which elements from a specific Component Family we want to attach and remove the rest. This greatly decreases the overhead, unavoidable with MonoBehaviour system.
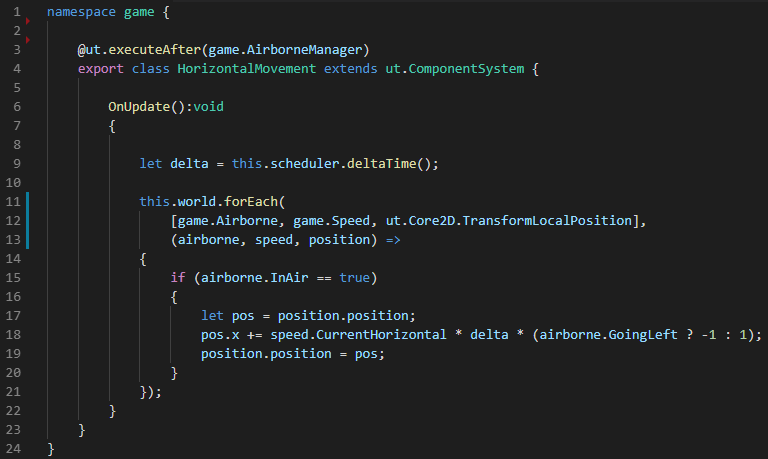
Because neither Components nor Entities can contain logic, every action happens inside Systems. It is Systems that manage and control all entities and their components – every frame each System’s update function is called – just like with MonoBehaviours, but because a System is not attached to any object, we search for each existing Entity containing a specific set of components and then operate on all found objects. In the picture below we can see a code fragment written in TypeScript (Project Tiny and ECS are still in development state and C# integration is not yet implemented) representing an example use of a System.
We won’t talk about every line of code here for now – the interesting part to us are the lines 11 – 13. Method forEach, defined in World class will gather all existing entities containing all three specified components: Airborne, Speed and TransformLocalPosition (visible in line 12). Both Airborne and Speed components are user-defined – they contain data used to determine the velocity of currently iterated Entity. Next we have TransformLocalPosition, defined in ut.Core2D namespace. Because this system is responsible only for the position of our Entities, we don’t need to gather objects with TransformLocalScale or TransformLocalRotation components. In line 13 we assign a name to each component specified in line 12 (e.g. TransformLocalPosition is assigned a name “position”). Then, between lines 15 and 20, we operate on all gathered Entities – in this example we move our object to one side if it’s midair.
Project Tiny
We mentioned the Entity Component System model only briefly because of how extensive its functionality is, but we will dig a little bit deeper into it while working with Unity’s new addition, the Project Tiny. This module, accessible from Package Manager in version 2018.3, was designed to greatly reduce the size of our game, as well as decrease load times.
Project Setup
In order to start working with Tiny, we have to install it first – we can achieve this by selecting Window, then Package Manager. We will be presented with a view containing all installed and installable packages. Because Project Tiny is still in development, we have to select Advanced at the top of the window and check Show Preview Packages, click on Tiny Mode on the list and select Install.

When the package is successfully installed, we can notice that a few things have changed – there are several Tiny context menus added in multiple places. Starting with Edit, Preferences, we can specify what IDE we want to use to edit TinyScript files. In this blog, we will use Visual Studio Code because it’s free and for its integrity with a number of different languages, including TypeScript.
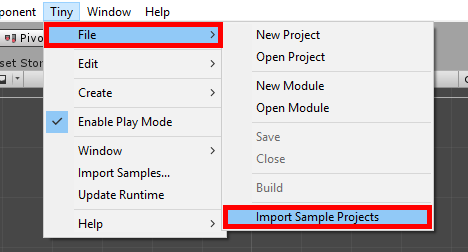
Another important menu can be found on toolbar at the top of Unity, called simply Tiny. Under this menu, most of the functionality important for us can be found. To create a new Tiny project, rather than selecting File, New Project, we have to initialize it from Tiny, File, New Project or File, Tiny, New Project. For this blog post, however, instead of creating a new project, we will import an existing one found under Tiny, File, Import Sample Project, so we don’t have to start from scratch.
Tiny Environment
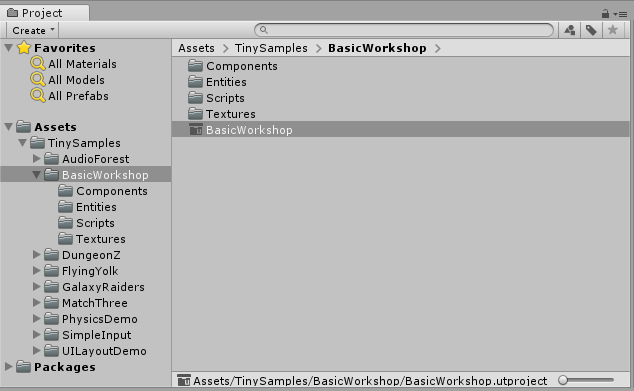
After Unity finishes downloading example assets, the first thing we have to do is to open one of the imported projects. In this blog post, we will work with a project called BasicWorkshop. To start working on this project we have to double-clicking BasicWorkshop.utproject, found in Assets/TinySamples/BasicWorkshop.
Immediately, we can see changes in Hierarchy and Inspector windows. The former, apart of new Create or Load options, does not show any scenes. Instead, Project Tiny uses Entity groups, with one of them set as startup – this group will be created at the beginning of the game.
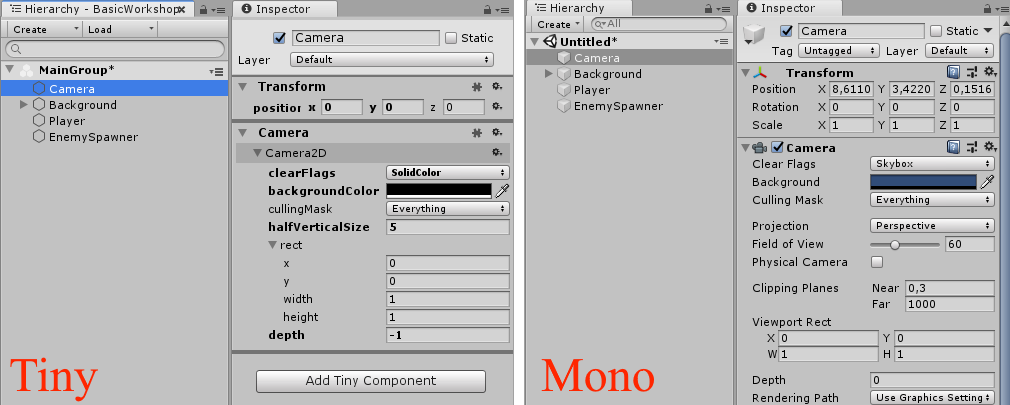
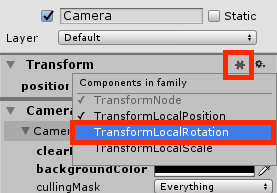
The Inspector window has different visuals as well. The camera object, for example, has a lot of different settings in default MonoDevelop view, whereas most of them are hidden in Tiny Mode. This is the result of project modularization – camera has only the position part of the transform, because in this project we don’t change its rotation nor scale. Should we ever want to add additional functionality, like camera rotation, we could press the Puzzle Piece icon at the top right of Transform component and check TransformLocalRotation.
Adding additional components to entity works similarly to adding components to GameObject – just select the entity of interest and click Add Tiny Component at the bottom of the Inspector. You will be presented with all available components. Some of them, however, are grayed-out – by adding these components an additional module will be included in our project. Each new module will add up to the size of the game, so be careful not to include unnecessary weight.
Additionally, the project structure should look something like this:
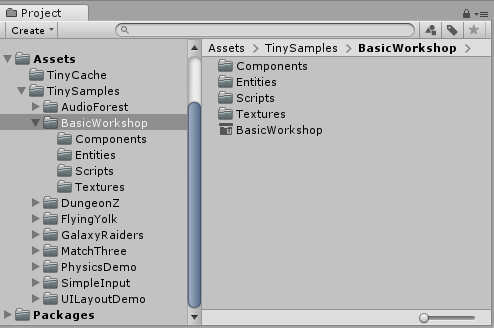
Notice the three folders inside BasicWorkshop called Components, Entities and Scripts – upon creating new Tiny project, these folders will be created automatically. By default, all newly created components, entities and systems will be moved to one of these folders.
Components
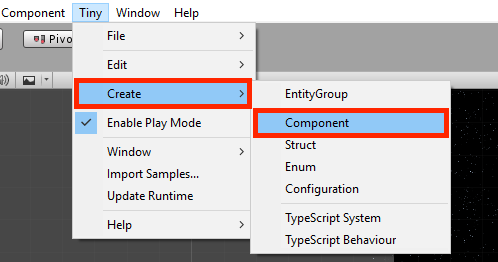
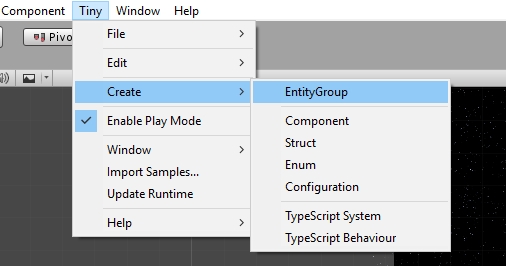
In order for entities to be a part of game logic, they have to have some components attached. As stated before, components consist only of data used by systems to determine what to do with entities. Entities can have any number of different components attached. To create a component, simply select Tiny, Create, Component at the top of the editor or right click in the Project window, then Create, Tiny, Component.
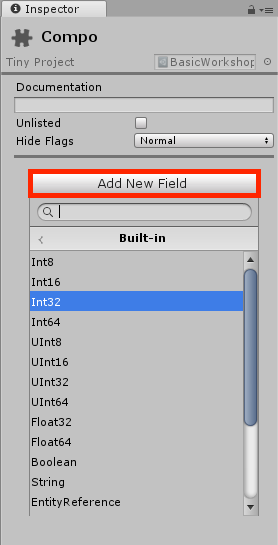
After these steps, a new component in Components folder will show up. The inspector view allows for adding new fields to our component, as well as setting some of its meta properties, like description. To add a new field, simply select Add New Field button and choose one of allowed types from the list. Keep in mind that adding grayed-out data types will result in adding additional modules to the project.
Whenever two entities have the same number and types of component attached, to systems they are almost identical (these entities belong to the same EntityArchetype). To distinguish similar entities which differ only to some degree, we might consider adding a dummy component, which will work like a tag, e.g. one type of spaceship is a ghost ship and shouldn’t be destroyed on contact. To achieve this we could create DestroyOnCollide component, without any fields and attach it to all ship entities, except the ghost type ships. This knowledge will come in handy when we get to the Systems chapter.
Entities
Components cannot be directly added to the game – they need to be attached to an entity. Although similar to GameObject, an entity is actually a lot simpler in its structure. Entities are just containers for components, whereas GameObjects also contain logic. Objects in the scene in traditional Unity workflow all have Transforms attached to them, meaning they all have position, rotation, and scale. Entities, on the other hand, are not required to have any component attached (they don’t even have a name by default!), which is handy when they are used purely for logic handling purposes.
As of now, prefabs are not supported in Tiny Mode, but Unity developers are already working on it. To imitate prefab behavior, we have to use objects called EntityGroup. To create an entity group, select Tiny, Create, EntityGroup at the top of the editor or right click in the Project window, then Create, Tiny, EntityGroup.
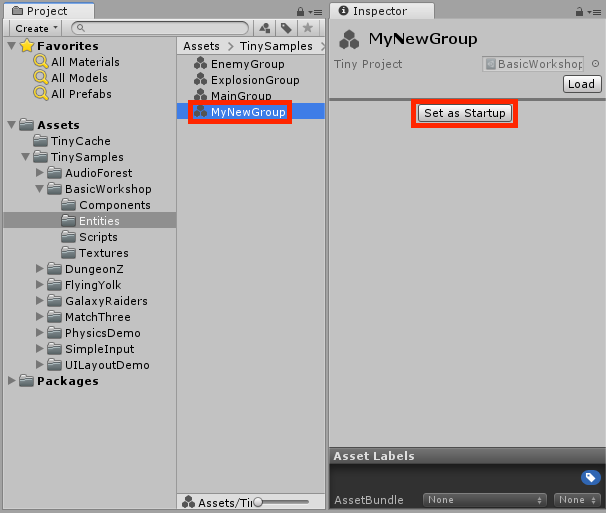
Each project must have at least one EntityGroup, which will be created at the start of the game. As we have mentioned before, Project Tiny doesn’t use traditional Scenes. Instead, we have to set one of existing EntityGroups in the Project window and click Set as Startup button in the Inspector.
By double-clicking on an EntityGroup we can add it to the game. Have in mind, that even though we might have multiple EntityGroups open at the same time, only one can be set as a Startup group, which means others won’t be created right away – explanation how to start the game with multiple EntityGroups created will be shown in the Systems chapter. To unload an EntityGroup, right-click on it in the Hierarchy window and select Unload EntityGroup (for demonstration purposes, we will unload all other EntityGroups except for our newly created one).
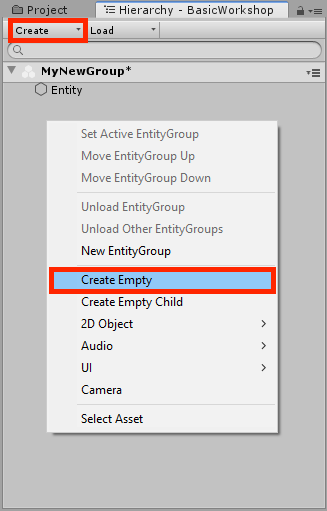
With EntityGroup added to the game, we can now add Entities to it. To create an entity, right click in the Hierarchy window and select Create Empty, or click Create button visible at the top of the Hierarchy, then Create Empty.
This way, we can also create some common entities right away like camera or simple sprite. A default camera entity will have two components attached to it: Transform and Camera component. Because we don’t really need scale on our camera, we can remove it by clicking on the puzzle button and unchecking TransformLocalScale. For presentation purposes, we will leave the TransformLocalRotation for now.
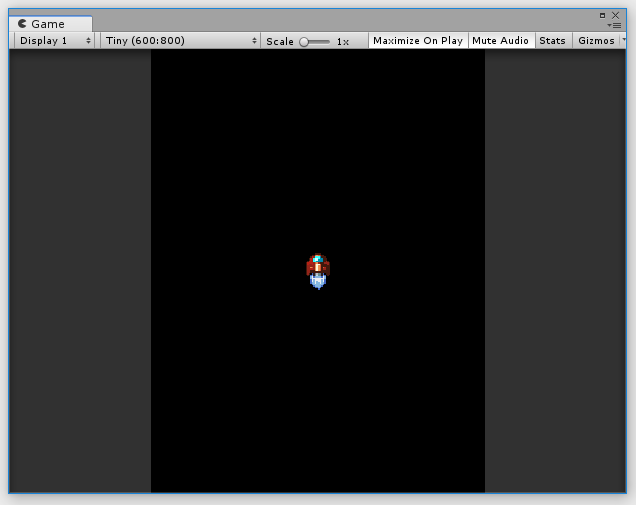
With camera set up and ready, we can add some visuals to the game. Create a new entity, but this time select 2D Object, Sprite. A white square should be now visible at the center of the screen. Selecting our sprite in Hierarchy window will show us the Sprite Renderer component attached. We can now choose an image to be displayed by our sprite entity. Our Game window should look something like this:
When we click play, our default web browser should open and we should be able to see our little ship in there. However, for now it won’t do much apart from sitting there motionless – that’s because we don’t have any systems set up.
Systems
As mentioned in the previous chapter, for our ship to do something, we have to create systems. Systems workflow looks like this:
- Define which group of components (EntityArchetype) the system wants to operate on
- Gather all entities in the game that belong to defined archetype
- Operate on components of gathered entities
Looks simple, however, this approach to game development feels a lot different than the way we program logic with MonoBehaviours. Because systems should contain only logic inside of them (we can define fields inside of our system class if we need to, however) and they are not attached to a single entity, but rather operate on all at once, it might get a little confusing when we try to implement more complex behaviors. Additionally, when a system is defined, it will start running right off the bat when our game launches – we can’t disable a system (except for commenting it out).
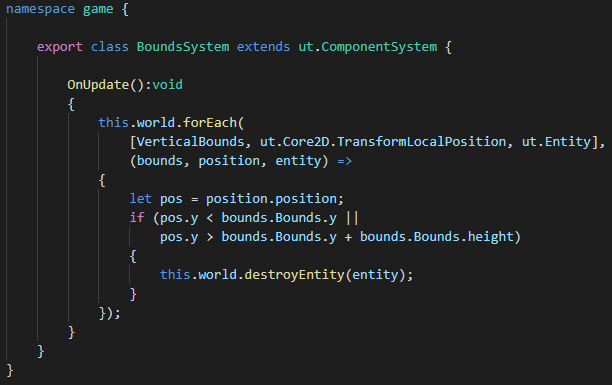
There are two different kinds of systems we can create in Project Tiny: TypeScript System and TypeScript Behaviour. The former derives from ut.ComponentSystem and has only one method called by the Unity engine – OnUpdate. Similarly to MonoBehaviour’s Update, this function is called every frame. We can use these systems for most of the game logic – move all entities according to their velocity, rotate sprites, display score, shoot lasers and so on. Sometimes, we won’t even gather entities unless some condition is met, like shoot only when the space bar is pressed. Below, we can see an example of a system that destroys entities out of bounds specified in component VerticalBounds.
Having only the OnUpdate method means that if we were to use this kind of system to initialize our game, we would have to do it on the first update and then on every other frame check if we have initialized the app.
To solve this problem, Unity introduced the second system type, called TypeScript Behaviour. Although it looks more like MonoBehaviour, underneath it works just like the other system type. First, we have to define class that derives from ut.EntityFilter. this class should contain fields representing components of our entity.

Class InitializationFilter contains only one component, named StartingEntities. This component has an array of strings, which we will use to instantiate additional EntityGroups.
Next, we have to define a class deriving from ut.ComponentBehaviour that will handle all entities which belong to the EntityArchetype defined by our filter class.
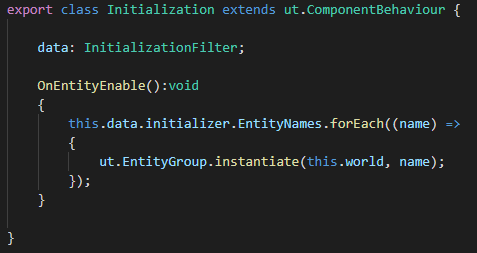
Initialization class contains one field, called data, which will be filled with data of a different entity belonging to our EntityArchetypeon every update. Apart from OnUpdate method, this type of system contains two additional functions: OnEntityDisable and OnEntityEnablevisible, visible on the screen above. In our example, these two will be called only during the frame an entity with StartingEntities component attached is enabled or disabled (or created/destroyed).
Summary
Working with ECS and Project Tiny will require switching to a different mindset. We have to stop thinking about objects as individual beings and start to recognize them as groups. Each entity can be divided into sets of archetypes, which can be treated like objects of the same type. However, even though Project Tiny has advantages over traditional Unity workflow, like smaller build sizes, faster loads and better optimization, it might not be the best suit for every type of project. Writing sophisticated systems that work for multiple different entities can be quite a challenge. Additionally, as of today, Tiny supports only TypeScript, which might require some time to be learned, if we are not familiar with JavaScript. Different game engines and different approaches give different results, however, what defines a good developer is a skill to choose the right toolset for the right project.