If you’re writing a custom script then most probably you want to manipulate its public field values from the Inspector. By default, the Inspector fields are placed next to each other and the field name is the only information that you receive. You can write a custom editor, but this requires creating another script with a lot of code and this takes time. If you want to keep it simple then there’s a way! Just use the Decorator Drawers!
Decorator Drawers are attributes that can be set on any public field in your script to change the way it is displayed in the Inspector view (in fact, it renders some additions before the field is rendered). There are two built-in decorator drawers:
SpaceAttribute
The SpaceAttribute can be used to add some spacing in the Inspector view. In this way you can separate two or more groups of properties so they are more readable.
Let’s take a look at this example:
using UnityEngine;

public class SpaceDecoratorDrawerExample : MonoBehaviour {
    public int health = 0;
    public int maxHealth = 100;
    public int shield = 0;
    public int maxShield = 0;
}
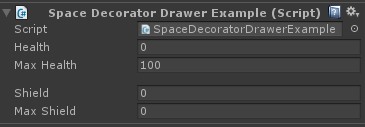
This script manifests itself like this in the Inspector view:
To improve the readability we can split these properties to two groups: the health and the shield group. In order to do that, just add [Space(10)] before the shield field.
using UnityEngine;

public class SpaceDecoratorDrawerExample : MonoBehaviour {
    public int health = 0;
    public int maxHealth = 100;
    [Space(10)]
    public int shield = 0;
    public int maxShield = 0;
}
The number 10 here means that we want the space to be 10 pixels tall. Here’s how it went:
Please note that adding a [Space(10)] there doesn’t mean “put space between maxHealth and shield fields” but instead “draw a space before shield property”. Usually it won’t make a difference, but it’s good to know if you encounter any issues.
HeaderAttribute
The header attribute adds a header label before the field that this attribute is assigned to. Here’s the example code:
using UnityEngine;

public class HeaderDecoratorDrawerExample : MonoBehaviour {
    [Header("Health Settings")]
    public int health = 0;
    public int maxHealth = 100;
    [Header("Shield Settings")]
    public int shield = 0;
    public int maxShield = 0;
}
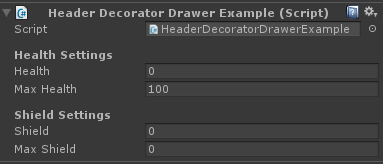
And here’s how it looks like:
As you can see it’s just similar to SpaceAttribute but there’s also a header label visible. And it has been done with a single attribute without writing a custom editor script!
Using Space and Header at the same time
You can use both properties at the same time. All you need to know is that these will be rendered in the reversed order. So if you write:
[Header("Shield Settings")]
[Space(10)]
public int shield = 0;
The space will be rendered at first, then the header. Don’t worry if you forget about that. You will notice your mistake once you look at the Inspector.
Writing custom Decorator Drawers
You’re probably thinking whether you could write your own Decorator Drawers. Yes, you can! Yet we will look into this topic in another article. Thank you for reading!


