In the last part of our post available here: Google Play Instant Games – Basics and Business, we explained what an Instant App is and how useful it is both to user and developer. We did mention how to design an Instant App, and what steps to take while developing it. We will get more into it in this article and focus on the optimization and tricks to make your build smaller.
What is Google Play Instant Plugin for Unity?
This Google Play Plug-in is a useful tool made for Unity allowing players to try your game in an instant. As mentioned in the previous part of the blog the app has to be under 10MB! For Games that were not built with this limitation in mind, it can be quite a challenge to reduce the size that much. However, we are going to share some useful tricks we had to use in order to get there.
Google Play Instant Plugin Basics
We are using Unity 2018.2.17f1, but you could use any version higher than 5.6.
The version of Unity has an impact on the size of the build because of compression differences. The new Unity 2018.3 which is currently in beta has even better compression. The compression allowed us the reduce size of our previous build by almost 1 MB (it makes a huge difference!!!), when the minimal APK size generated in 2018.2 is 6.5 MB. Taking that into consideration, we are left with 3.5mb for the game. On top of that, we could download an additional asset bundle (max. 15mb) . Asset Bundles are archived files containing platform specific Assets, those can be later loaded at the runtime. We will explain how those work later on.
It is important that many other plugins can take a lot of space in our APK, such as: DOTween, TextMesh Pro tools, etc. It is still possible to use them in your Instant App, if necessary, but with proper optimization that we’re going to show you!
Build Size Comparison
Basic size of an empty unity project is 22.5 MB, but when using unity 2018.2 and proper optimization (stripping everything that is not being used) it is 6.5 MB. How did we achieve it? All of the operations we have done are things that are built in Unity, without using external sources.
Unity made a great lecture about Optimizing Binary Deployment Size available here:
https://www.youtube.com/watch?time_continue=344&v=4JLpJHIdx7E
They have also provided a link for a useful editor script which allows us to analyze what goes into our build and how much space it takes.
Download here: https://files.unity3d.com/jonas/BuildReportInspector.zip
After adding the script into your project a new option under the Window menu is available, called “Open last build report”. When you open this inspector window you will see information about your last build (the option won’t be visible if you haven’t build the game yet), looking like this:
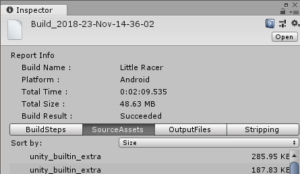
The part that is the most informative for us is SourceAssets, here we will be able to see which assets are the heaviest, so we can get rid of them or compress them.
Talking about the compression in Unity, we are going to show you some examples of how to reduce the size of your audio files and textures
Compressing assets
Audio Clips
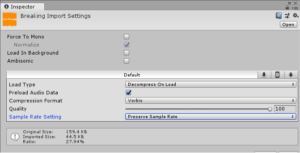
Here is an example of a compressed audio file which import size is 44,5 kb. After changing Quality to about 10% and Override Sample Rate to about 22,050 Hz, we managed to reduce the size by over 40 Kb!
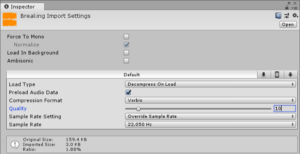
It might not seem like a lot but imagine 10 audio clips like that, which together would take about 0.5 MB, that is quite a lot while working with Instant Apps
Textures
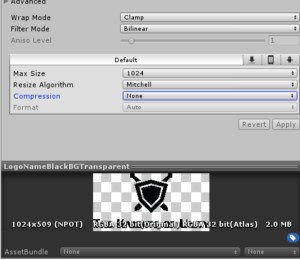
As you see the basic high resolution image takes over 2MB of space in your build, but we can compress that too, by changing max size to 256×256, compression to “Normal Quality”, enabling Crunch Compression and setting up Quality to 50%, we reduced the size to only 127KB.
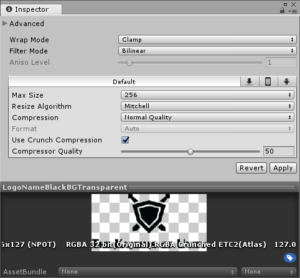
To optimize your Sprites you could use a Sprite Packer, which is a convenient tool while working with a lot of separate textures to create one atlas out and avoid empty space.
More information on what it is and how to use Sprite Packer can be found in Unity Documentation available here: https://docs.unity3d.com/Manual/SpritePacker.html
Lots of Plugins used in projects such as DoTween mentioned before take a lot of space, it is possible to save some space by modifying those. For example, the new updated version of DoTween allows us to remove modules that we won’t be using with this plugin such as Physics or Audio.
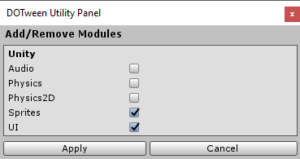
While making Instant Apps it is important not to use many plugins as those take a lot of space build. For example, when we were making an app using an asset called “Rewired”, which is an amazing advanced input system, it turned out to be too big. Even though it was great for our main application, we had to remove it while making an instant app and rewrite inputs in order to save over 4MB in size! So be careful while using 3rd party software.
Importing and Setting up Google Play Instant Plugin
So first things first, to import the plugin, simply follow this link: https://assetstore.unity.com/packages/tools/integration/google-play-instant-plug-in-118292
and download the asset into your Unity Project.
After importing is done, you will be able to see a new menu field called “PlayInstant”.
Use the Check Player Settings option visible there to ensure you have everything set up correctly.
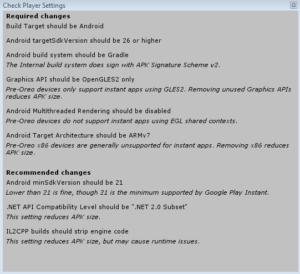
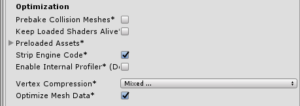
Also, make sure you are using IL2CPP as your Scripting Backend and enable the option to Strip Engine Code, this will save a lot of space while building your project.
So make sure to remove any plugins that do not contribute to your Instant version of the application, such as Rewired, and rewrite your code.
Google Play Instant Plugin allows us also to move the parts of our game into AssetBundles but those are not essential so skip this step if you don’t have that many assets and scenes. We are not going to cover the usage of Asset Bundles in this post.
*Note: Only if you are using Asset Bundles!
Start by setting up the AssetBundle Manifest field in Play Instant Build Settings.
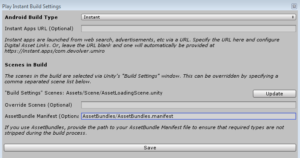
This will ensure that the AssetBundles won’t be stripped.
To get more information about Asset Bundles and how to Load them into your game, follow the link to Unity Documentation available here: https://unity3d.com/learn/tutorials/topics/best-practices/assetbundle-fundamentals
Package Manager
Manager allows us to enable and disable key components of the engine. It is worth to mention that if you disable any package such as Particle Systems you won’t be able to use any of them in your project and all objects which contain components from this package will be grayed out and you will able to see errors in your code in the places where this package was used.
Removing not used packages that are in your project through Package Manager will reduce the size of your build, so if you do not need things like Analytics, Ads or Physics 2D / 3D, remove them using Package Manager.

Things to remember
- Make sure to remove plugins that are not required in your Instant Version of an application such as Rewired, and rewrite the code to suit this version.
- Remove any scripts that are not being used in your project.
- Remove any shaders that are not being used.
- Make sure your resources folder does not contain files that are not needed. Also, try not to load assets through resources folder.
- Check if your project is using XML serialization – if not, make sure nothing is referencing from System.Xml in your code. Ensure to check plugins too.
- Remove unused assets.
- In your Project Settings / Graphics, check the Always Include Shader option and remove shaders that you do not need in your application.
- If you are using assetbundle, ensure that loading scene is as small as possible.
- Set Logging in Player Settings / Other Settings to None.
- Check if objects in your scene contain components that you don’t require such as empty Audio Sources and remove them.
- Use the Tool mentioned before the check the size of the assets in your build to later compress them.
The last thing to do is to add your Instant App to Google Play. We will explain it in our next post about Google Instant Games. Stay tuned!
