Implementation
Previously, in part 1, we looked at the theory of both ML-agents deep learning algorithms and evolutionary computation. Now it’s time for us to implement the whole thing. First, let’s start by making a creature!
Creature
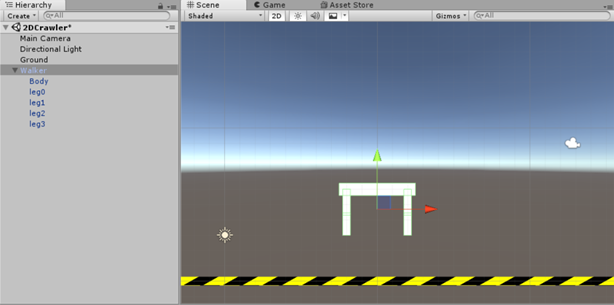
The creature we’re going to train will be designed in 2D environment, for the sake of simplicity. On the image below, you can see the creature in Unity’s scene. It has a body and 2 legs, where each of them consists of 2 parts.
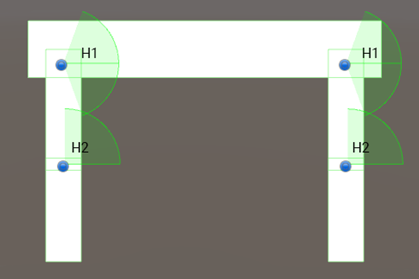
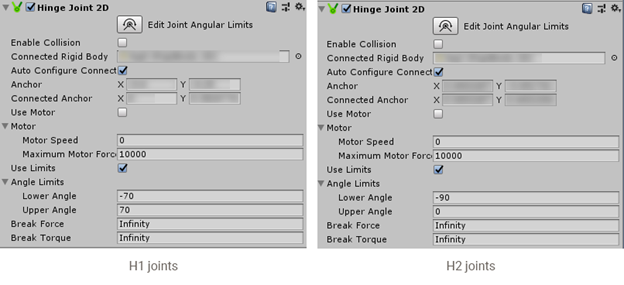
The leg parts are connected to each other and to the body using HingeJoint2D. Each HingeJoint2D has angle limits. Below you can see joints setup and configuration of angle limits for both types of joints: H1 & H2.
Well, that’s pretty much it. The creature is done. Easy, isn’t it? Now let’s move onto coding the AI.
ML-Agents
In my opinion, the most difficult thing about ML-Agents is installing the plugin itself. There’s whole bunch of tutorials that’re going to help you, though. Here’s a link to the official documentation and here’s a link to a great video-tutorial. We’ll skip this part and move on to the point where everything is installed and ready to go 😉
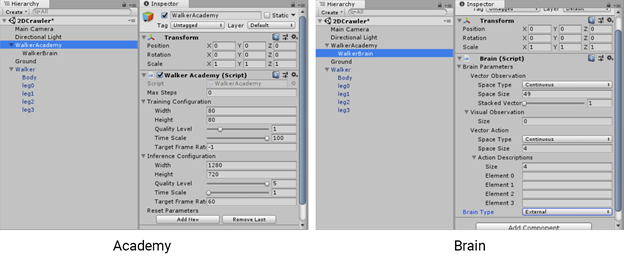
So, the first next thing for us to do in the scene is to add an Academy and a Brain. To create an Academy, we should write a simple script. For our task, it’s really simple. Name the script WalkerAcademy and inherit ML-Agent’s class Academy. That’s it. Academy has a couple of basic methods, buy we don’t need them in this project, so you can leave them empty.
public class WalkerAcademy : Academy
{
   public override void InitializeAcademy()
   {
   }

   public override void AcademyReset()
   {
   }

   public override void AcademyStep()
   {
   }
}
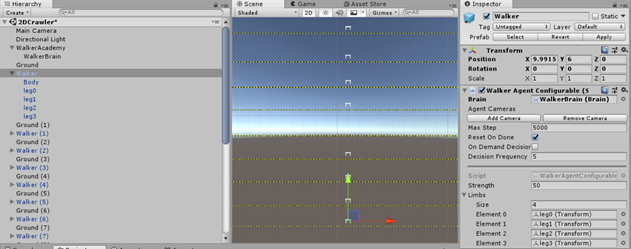
Create a WalkerAcademy object on the scene and add WalkerAcademy spript as a component to it. To add a Brain, create an object called WalkerBrain on the scene and parent it to the WalkerAcademy. Now, add a Brain script to it. Below you can see the scene setup we have at this point.
Configuring the Agent is also easy. Create a script WalkerAgentConfigurable which inherits Agent class from ML-Agents library. WalkerAgentConfigurable can override methods called CollectObservations() and AgentAction() which correspond to collecting observations and assigning actions respectively.
Observations
Based on the observations, Agent will make decisions. For our creature, we collect 49 observations, which serve as the input layer to our neural net. Below you can see CollectObservations() method:
public override void CollectObservations()
{
  AddVectorObs(body.transform.rotation.eulerAngles);
  AddVectorObs(bodyRB.velocity);
  AddVectorObs((bodyRB.velocity - past_velocity) / Time.fixedDeltaTime);
  past_velocity = bodyRB.velocity;

  for (int i = 0; i < limbs.Length; i++)
  {
	AddVectorObs(limbs[i].localPosition);
	AddVectorObs(limbs[i].localRotation);
	AddVectorObs(limbRBs[i].velocity);
	AddVectorObs(limbRBs[i].angularVelocity);
  }

  for (int index = 0; index < 2; index++)
  {
     if (leg_touching[index])
     {
  	AddVectorObs(1);
     }
     else
     {
  	AddVectorObs(0);
     }
  }
}
Limbs parameter is a public array that contains references to the legs’ limbs. Leg_touching is an array which holds a bool value whether the leg is touching the ground or not.
Actions and Rewards
Actions control movement of legs by applying torque to them. There’s only 4 actions coming from the Brain to our Agent. Each Action is a float value between -1 and 1. Each of those actions is multiplied by strength parameter.
We’ll reward our creature for speed it gains along X axis and punish it a little based on torque value, so it will have an incentive to not make excessive unnecessary moves. Also, every time the creature’s body touches the ground, it will receive -1 reward and restart the simulation. Below is the AgentAction() method:
public override void AgentAction(float[] vectorAction, string textAction)
{
   for (int k = 0; k < vectorAction.Length; k++)
   {
   	vectorAction[k] = Mathf.Clamp(vectorAction[k], -1f, 1f);
   }

   float torque_penalty = 0.0f;
   for (int i = 0; i < limbRBs.Length; i++)
   {
      limbRBs[i].AddTorque(strength * vectorAction[i]);
      torque_penalty += vectorAction[i] * vectorAction[i];
   }

   if (!IsDone())
   {
   	SetReward(0 - 0.01f * torque_penalty + 1.0f * bodyRB.velocity.x);
   }

   if (fell)
   {
      Done();
      AddReward(-1f);
   }
}
After the scripting part is done, add WalkerAgentConfigurable script to the creature object and multiply the walkers on the scene. This will make AI learn faster. Here’s how the scene looks after all this:
That’s it with the ML-Agents setup. It’s very easy and rapid. Now let’s look at the Evolutionary Algorithm.
Evolutionary programming
As I mentioned previously, this method was proposed by Alan Zucconi in his series of blogposts about Evolutionary Computation. If you’re interested in implementing genetic algorithm for this task, I’d recommend you read his blog where he explains the whole logic behind it and links the project in the end. Here, I’ll just mention some adjustments that were made to improve his project.
The idea behind making a walk under evolutionary programming is to make it a loop. Each leg will periodically be given different amount of torque depending on time. We can do it by applying a sine wave to each leg’s torque. Sine is a continuous function that describes smooth periodic oscillation. Here, we’ll use this function:
s = M -m21 + sint+o2p+m
Our sine wave is shaped by 4 parameters. Each parameter is a target to optimization. Here, p is a period, amplitude of sinusoid is ranged between M and m and o is an amount of shift on X axis.
Creature
First of all, the creature and control methods are different, comparing to the Alan’s model. In his project he used DistanceJoint2D to control the leg movement of his creature. Our creature is controlled using torque applied to the limbs.
One of the major changes was making the walk of create torque-based. Here, the creature is being controlled by Creature class, where torque is applied to each limb, defined by the sinusoid:
public class Creature : MonoBehaviour
{
   . . .
   public virtual void FixedUpdate()
   {
      if (!IsFallen)
      {
         for (int i = 0; i < limbRBs.Length; i++)
         {
            limbRBs[i].AddTorque(strength * Gene.Evaluate4At(genome.genes[i], Time.time - Evolution.startTime));
         }
      }
      genome.score = GetScore();
   }
   . . .
}
Crossover
Crossover is a vital part of evolution, since using this mechanism, creatures exchange the parameters, making new combinations of genomes. Here crossover is done only with best performing creatures:
public struct Genome : IMutable<Genome>
{
   . . .
   public static Genome Copulate(Genome g1, Genome g2)
   {
      Genome child = g1.Clone();
      // Crossing over
      for (int g = 0; g < child.genes.Length; g++)
      {
         if (Random.Range(0f, 1f) > 0.5f)
            child.genes[g] = g2.genes[g].Clone();
      }
      child.generation++;

      return child;
   }
   . . .
}
Mutation
The mutation also has been modified a little. There’s two types of mutation that happen in genome. First is implemented with Mutate() function, which brings in a small change to a random parameter. HardMutate() function, on the other hand, completely changes the parameter:
public struct Gene : IMutable<Gene>
{
   . . .
   public void Mutate()
   {
      int i = Random.Range(0, values.Length - 1);
      values[i] += Random.Range(-0.1f, +0.1f);
      values[i] = Mathf.Clamp01(values[i]);
   }
   . . .
}

public struct Gene : IMutable<Gene>
{
   . . .
   public void HardMutate()
   {
      int i = Random.Range(0, values.Length - 1);
      values[i] = Random.Range(0.0f, 1.0f);
   }
   . . .
}
Well, those are the major differences. In the next part we’ll take a look at the training process and the results themselves.