One of the most important Unity features is the ability to choose a rendering path. For those who are not very familiar with Unity, choosing (usually) between forward and deferred rendering paths may be something comparable to choosing between “normal” and “strange looking and something’s broken” rendering methods. To understand better why there is more than one rendering path, first you will need to understand the motivation behind it.
It’s all about lighting
Lights are expensive, mostly because a lot calculations has to be done to find out the valid color of a pixel when there’s a light in range. In Unity lights can be evaluated per-vertex, per-pixel or as Spherical Harmonics (SH). In this article we will talk only about the former two.
![]()
In per-pixel lighting, each pixel color is computed individually (as on the left.) You can see that even when I use low-poly sphere for this example, the lighting still makes it look round. If it wasn’t for the edges, it’d be really hard to spot where all the vertices are. Then, there’s per-vertex lighting. It makes one light calculation per vertex. All the other pixels between vertices evaluate the color using regular color blending algorithm (without further light calculations.) This is the cheapest method of lighting and yeah… it looks cheap (if you’re wondering where’s the pixel and vertex lighting switch, it’s hidden in the Light component under Render Mode option. Important option is forces the light to be pixel light, Not Important is vertex light, Auto makes the strongest light a pixel light.)
It’s not a secret that game developers love per-pixel lighting much more than per-vertex lighting. Yet it has a significant downside. Each light causes the additional rendering pass of each object in the range. There’s a limit of four lights that can affect the object. What’s more, there’s also a limit of shadows – based on Unity documentation only one light can have shadows (for some reason I’ve managed to get two shadows in Unity 5.3.4, so I’m not really sure about this one.)
Deferred rendering to the rescue!
There’s a technique that allows you to use as much lights as you want on your scene with keeping the performance at reasonable level. It does not limit the number of shadows and it does not cause additional draw passes if scene objects are within light range (objects casting shadows are exceptions.) It’s called Deferred Shading Rendering Path.
Why is it so different? Mostly because most of the models are rendered without lighting calculations and when the scene rendering is nearly done lights are applied to rendered 2D image. Making changes on this stage is usually called doing something in screen-space. Knowing that, we can say lighting in deferred rendering is screen-space. To understand it better, let’s look at the Frame Debugger.
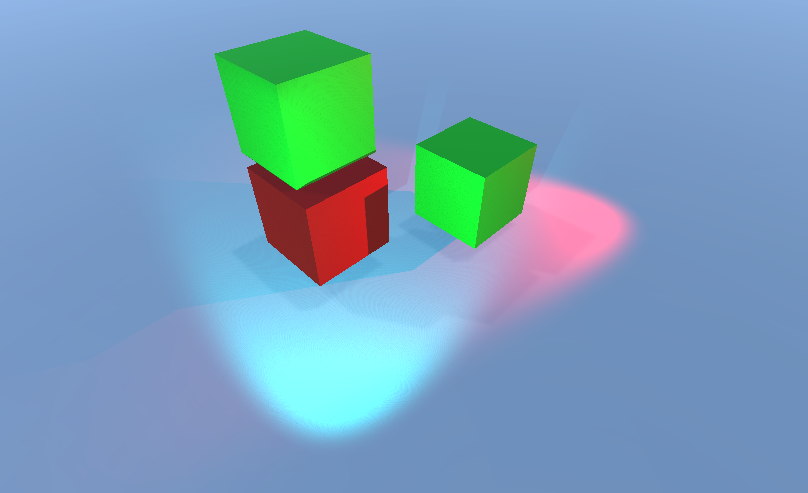
Scene rendering starts with rendering all geometries:
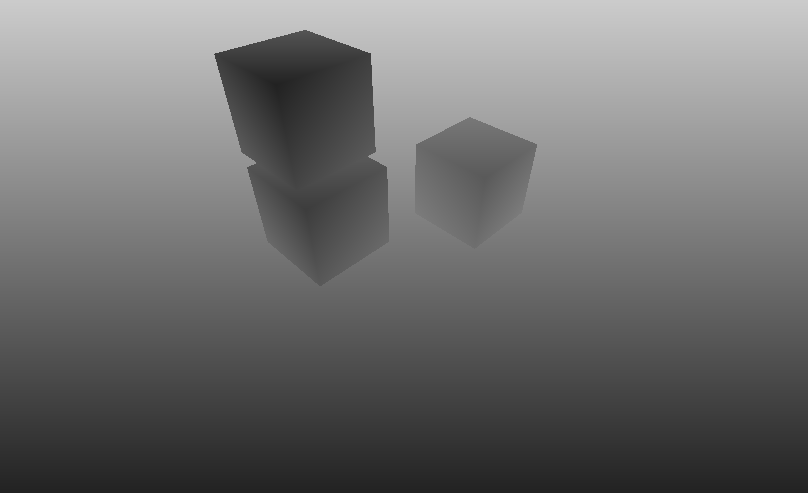
This is a flat image, so how graphics card will know how to apply lights and shadows? Thanks to the depth buffer! You can think of depth buffer as of another image that is hidden from you and that stores the information about how far from the camera each pixel is located. When represented as image, it may look like this:
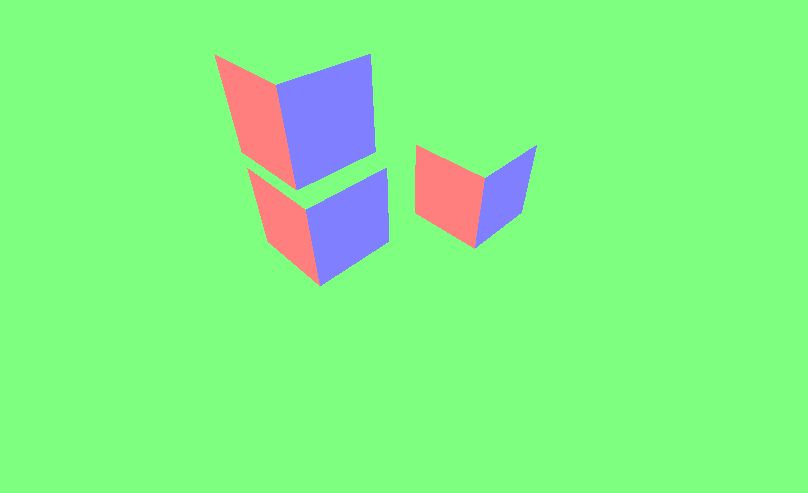
Depth information alone isn’t enough to figure out how light should be applied on the surface. Still, we need at least one more thing – the orientation. Orientation in 3D space is usually represented by normals. The unusual thing is that along with color buffer and depth buffer, there is a buffer with normals!
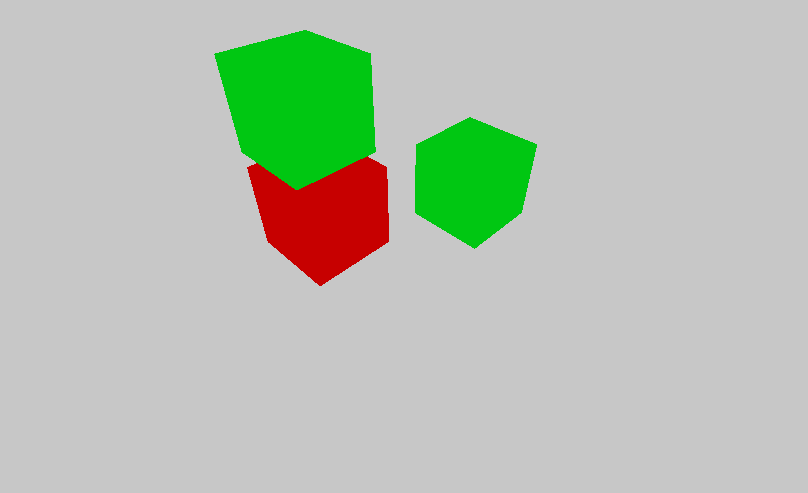
How can you tell that these are normals? It’s pretty easy! Just look at the Scene Gizmo.
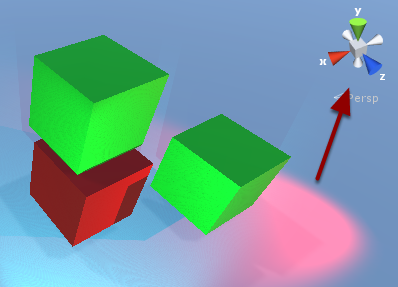
Do you see the color resemblance? Red cone (x) points to the left, so do left faces on previous image. Green (y) to the top and blue (z) bottom-right (from this perspective). It all matches the colors of faces from before.
Basing on that information, lights and shadows can be rendered. It really doesn’t matter how many objects there are on your scene. Everything gets done only on the final image.
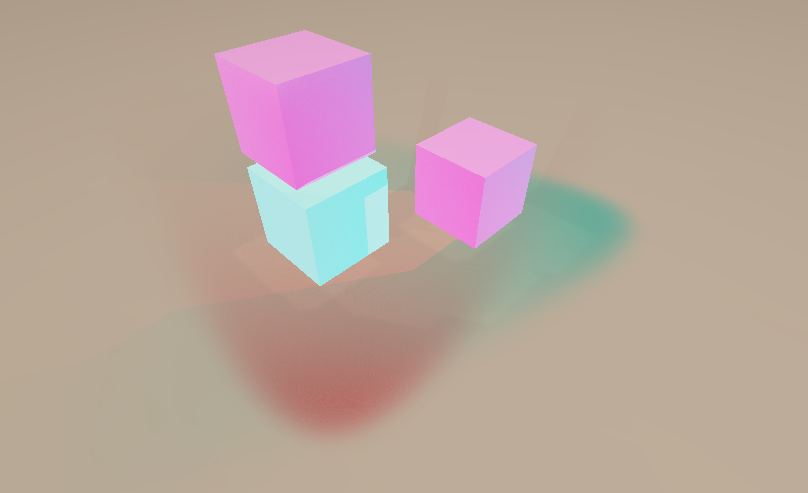
The image above is the result is an inverted version (1 – color) of lighting pass. At the end it is blended with the first opaque image to get the final result.
Which one should I choose?
After reading all of this you may be full of enthusiasm to use the new rendering path, but hold your horses! Deferred rendering is not a remedy for all of the world problems. It has some…
Limitations
It would be too great to be true, wouldn’t it? There are some limitations.
First of all, deferred rendering does not allow us to render semi-transparent objects. That’s because if something semi-transparent exists on the scene, there’s no way to write down depth and normals for objects that is visible through semi-transparent objects and for current object itself. Unity handles this limitation rendering semi-transparent objects using forward rendering path at the end of the whole process. It works quite well, these objects can cast a shadow, but unfortunately they are unable to receive shadows from other objects. They can also cause some unexpected issues, not known when using forward rendering.
The second limitation is the lack of anti-aliasing support. The reason is similar to the issue with semi-transparent objects, but Unity does not try to workaround it in any way. Instead you can use screen-space AA algorithms (image effects), but the visual effect may be less good-looking.
Another limitation is that you can use up to four culling masks. In the documentation you can read:
that is, your culling layer mask must at least contain all layers minus four arbitrary layers, so 28 of the 32 layers must be set. Otherwise you will get graphical artifacts.
And finally there’s no support for the Mesh Renderer’s Receive Shadows flag.
Requirements
If that’s not enough, deferred rendering works only on a limited set of graphics cards. When it comes to PCs, you can safely assume that all graphics cards not older than 10 years will support it. When it comes to mobile devices, you should assume nothing. But that’s not a big issue, because…
Performance
The most important thing is that deferred rendering in most cases will get a worse performance on mobile devices than forward rendering. It’s because of additional passes that need to be done on each frame. If you’re using only one light, then it may not be worth it.
On the other hand, adding extra lights is quite cheap. In the worst case scenario performance will drop linearly and compared to forward lighting, it’s independent of number of objects on the scene.
Resources
I hope that this article will cast some light on what rendering path you should choose for your game. Anyway, you may also be interested in these resources: