Vuforia is an AR platform that provides amazing opportunities for augmented reality development. Here are some examples:
Vuforia also has a Unity SDK and in the second part of this tutorial I’ll explain how to integrate and develop it. But let’s start with the Vuforia integration…
Obtaining a Vuforia license
 The first thing you have to do is register on Vuforia page. After you complete the registration process, you can start developing with Vuforia SDK. You will then need a license for your project.
Head over to the Development tab, and click on the “Add license” button. A little form will show up. Fill in the form as shown on the side and click “Next”.
Then you have to confirm your license key by agreeing with terms and conditions and by clicking “Confirm”. Pretty simple so far, right?
Vuforia’s Unity SDK
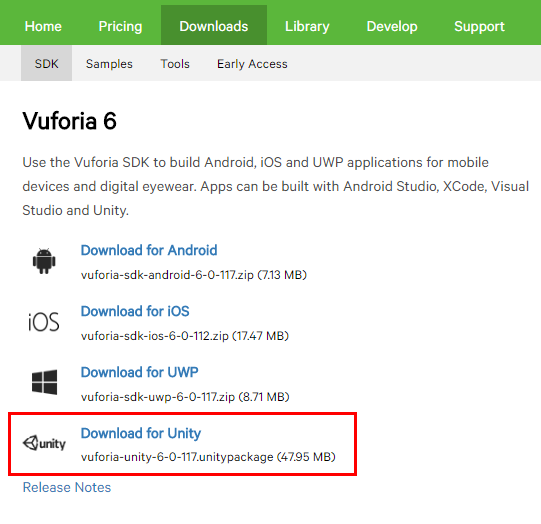
It’s time to download the Vuforia SDK for Unity. You can download it in the Vuforia Downloads tab.
After downloading the package, import it into the existing project inside of Unity.
Prepare the markers
Now it’s time to prepare the markers. Markers are the images that Vuforia will use as the points of reference to display your objects. The more distinct key points the image has, the more accurate or “augmentable” your markers will be. The easiest way to create such marker is to generate a QR code. QR codes have a lot of key points and they work like a charm. You can generate them yourself or, to make it quicker, you can download mine 🙂
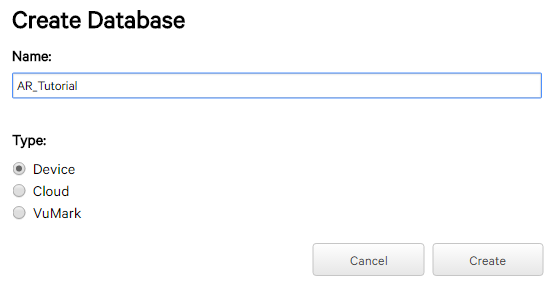 Once you’ve got the marker, it’s time to upload it to Vuforia. Go to the Vuforia Target Manager page and click on the “Add new database” button. Type the preferred name for your database and choose the “Device” as a Type option.
Great! Now, select the name of the database you’ve just created and then click on the “Add the new target” to the database.
Select the Single Image type, pick the marker you’ve downloaded before, set the width to 1, name it the way you want it and click “Add”.
There are other types of targets, for example Cuboid, Cylinder or a 3D object. These can work as 3D markers (you can make them if you feel like it), but preparing them would take a lot more time, because you’d have to create and upload every side of that cuboid to Vuforia and that’s a chore…
Alright, so now you can see your target has been added to the list and it’s ready to be downloaded. Click “Download Database” and import the package to Unity.
Preparing the scene
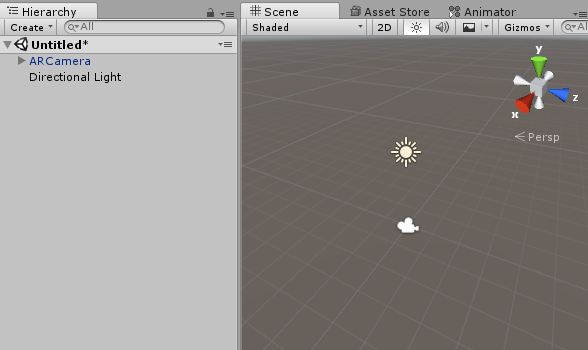
Setting up the scene is also very easy. Get rid of the existing camera on the scene. Vuforia has its own camera that your scene will use. Drag and drop ARCamera prefab from Vuforia > Prefabs folder into the scene. Your scene hierarchy should look like this:
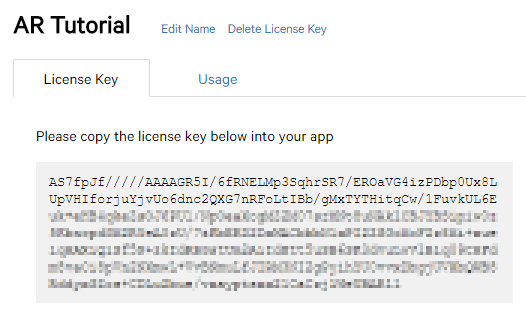
Now, let’s setup the ARCamera properties. ARCamera prefab requires the license key which you can find on the Vuforia License Manager Page.
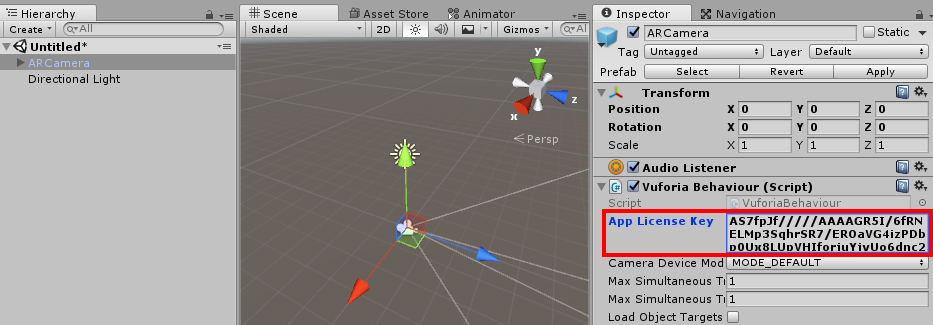
Copy and paste your License key to Vuforia Behaviour Script field of the ARCamera prefab on the scene.
Select ARCamera in your hierarchy, and in the Database Load Behaviour tick the “Load [name] database” checkmark, then “Activate”.

Setting up the markers
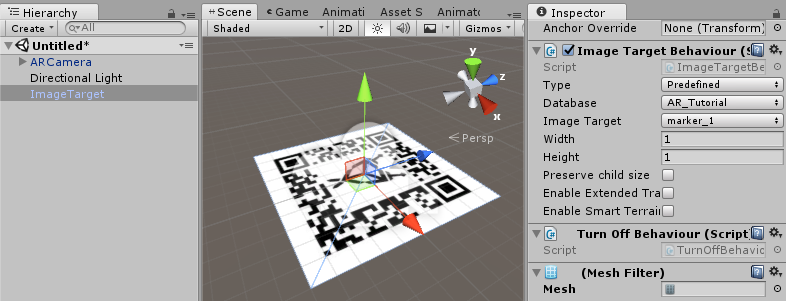
Alright, now it’s time to add the markers on the scene! You can do it by dragging ImageTarget prefab from Vuforia > Prefabs to your scene.
Your ImageTarget needs to be set to a specific marker image. It has a script called “Image Target Behaviour”, where you can do that by choosing your database name in the “Database” field and then select the “ImageTarget” from the drop down list. It should look like this:
Great, you’re almost done! Now it’s time to add some objects to the display. Right click on the ImageTarget in the hierarchy, 3DObject > Cube. Resize the cube the way you want it and the project is ready to be compiled! Alternatively, you can add any 3D object to the hierarchy of the ImageTarget.
As you can see, Vuforia SDK is very easy to setup and it has a lot of nice features you can utilize to make awesome games or apps. For example, you can combine a couple of those markers to make something a bit more complicated like this:
We recreated an old-school retro arcade game, Arkanoid, in Augmented Reality using Vuforia & Unity. #gamedev #unity3d #AugmentedReality 🕹 pic.twitter.com/AuTFRZbUr3
— The Knights of Unity (@KnightsOfUnity) May 27, 2017
Procuring Graphical Assets
You will need some 3D models. I’d suggest that you download and import these amazing drone models by Popup Asylum.
Next, we’ll need a QR code as an additional marker. You can generate your own, but feel free to use mine if you’re lazy 🙂 Also don’t forget to upload it to the Vuforia Target Manager page and download the updated database after that.
For the testing purposes you’ll need these two markers printed, so I’ve also prepared a pdf for you to download.
A few more textures for you to import: drone_shadow, white_ring.
Scene setup
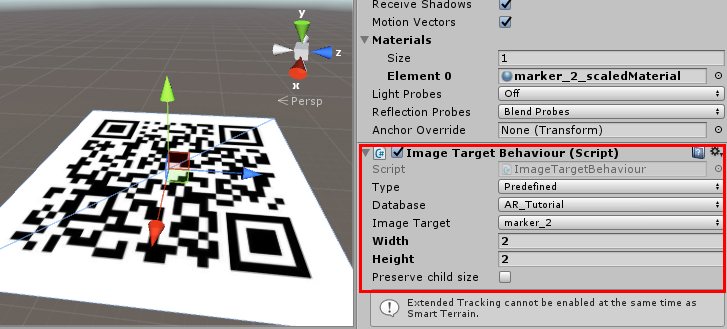
Drag and drop 2 ImageTarget prefabs from Vuforia > Prefabs to the scene. Name the first one as “DroneTarget” and the second one as “GoalTarget”. After that assign the corresponding “Image Target” to each one of them in the Image Target Behaviour Script. In the same script, change the width of the DroneTarget to 3 and GoalTarget to 2. It should look like this for the DroneTarget:
And like this for the GoalTarget:
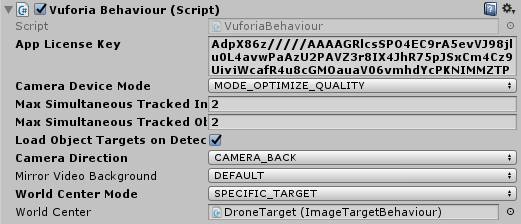
Now in the ARCamera object in our hierarchy, head over to the Vuforia Behaviour Script and change the value of “Max Simultaneous Tracked Images / Objects” to 2. Then in the “World Center Mode” section select “SPECIFIC_TARGET” from the drop down list and in the section “World Center” choose the DroneTarget from the hierarchy. It should look like this:
Connecting Models to Markers
We’ve got the markers, let’s add the 3D models they will represent…
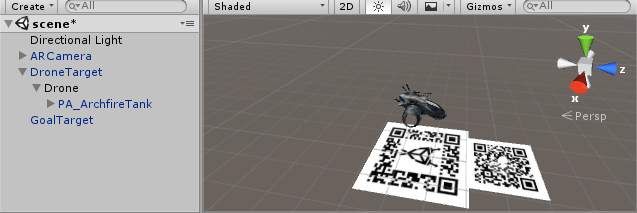
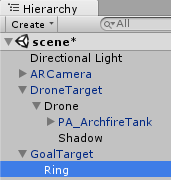
Right click on the DroneTarget and select “EmptyObject”. Make sure this new object has a position of [0;0.5;0] and scale of [0.33;0.33;0.33]. I’ve also changed the name of it to “Drone”. Then, add a 3D model of any drone as a child to this object and change the position of it to [0;0;0] and scale to [0.33;0.33;0.33]. Now the hierarchy looks like this:
So, let’s add a model for our GoalTarget. Add an empty object same way we did for the DroneTarget and change its name to “Ring”. Then add a Sprite Renderer to that object and in the “Sprite” section, choose our ring sprite. After that you can change its color to whatever you’d like. You also might want to resize it, change the position to make to fit the QR marker. It kind of looks like this for me:
Nav Mesh setup
Alright, so we’ve got the scene, let’s now get to the main functionality… Pathfinding. So we need to bake a Nav Mesh. For more info, please, go to Unity navigation tutorial page.
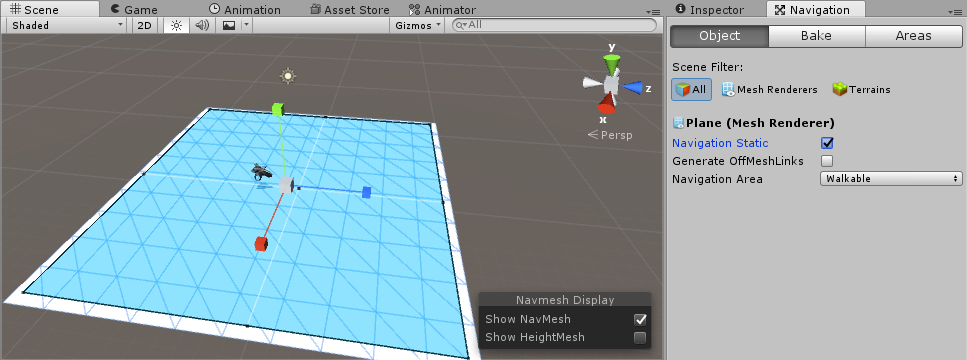
Baking a Nav Mesh requires a presence of a regular mesh on the scene to walk on first. Right click on the hierarchy 3D Object > Plane. Rescale the plane so it covers an area around the markers where you potentially would like your drone to move. Now open up the navigation window (Window > Navigation) and in the Object tab make sure your plane is selected along with a “Navigation Static” checkbox. After that click “Bake”. Fantastic! If your scene looks somewhat like this, you’re on the right track!
So what do we do with that annoying white plane obstructing the view? Well, it’s time for us to get rid of it. Yeah, just delete it, we won’t need it anymore, since the Nav Mesh is already baked.
Once we’ve got our Nav Mesh, it’s time to setup a Nav Mesh Agent, an actor that would travel using the Nav Mesh. The Nav Mesh Agent functionality should obviously be applied to the drone, so select the first child in the “DroneTarget” hierarchy…

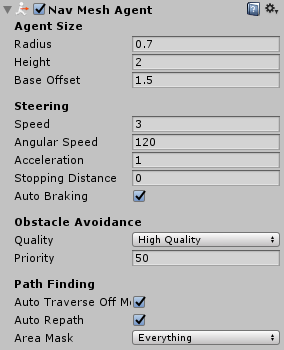
… and add NavMesh Component to the inspector. You’ll see a whole bunch of parameters for this component. I’m not going to explain what each and every one of this parameters means since that’s not the point of the tutorial. (If you’re interested in the commentary over the parameters, please watch this video and here’s Unity docs). Here’s a screenshot of my Nav Mesh Agent parameters for the drone:
Coding time
The initial scene setup is ready and it’s time to write some code for it to work… Create a script in one of your folders and add it to the “Drone” object (DroneTarget first child).
The whole moving mechanic is pretty simple. We’d need two variables variables:
//destination marker reference
public GameObject markerGoal;
//parent position
Vector3 parentPos;
//navmesh component reference
NavMeshAgent agent;
Initialize the NavMeshAgent variable on start:
void OnStart()
{
   agent = GetComponent<NavMeshAgent>();
}
A function to track a position of the second marker and move the drone towards it:
void MoveToTarget()
    {
        if (markerGoal.active)
        {
            parentPos = markerGoal.transform.parent.position;
            agent.SetDestination(parentPos);
        }
    }
That’s it. Just execute this function in the update and don’t forget to select the “Ring” (GoalObject child) object as a public variable in the inspector.
You can now build the project onto your phone and check whether it works with the markers.
NOTE: The DroneMarker should always be in the camera view for the whole app to work since we’ve declared it as the world center and the whole drone logic is attached to it.
Drone leaning
You might also want your drone movement look more realistic, so let’s add movement leaning. The done will lean forward depending on its current speed.
MapRange function
There’s a great function I use pretty often called MapRange. It converts numbers within a range to numbers within another range depending on the current value.
//s - observed value
//a1 - min s value, a2 - max s value
//b1 - min result value, max result value
float MapRange(float s, float a1, float a2, float b1, float b2)
{
    if (s >= a2) return b2;
    if (s <= a1) return b1;
    return b1 + (s - a1) * (b2 - b1) / (a2 - a1);
}
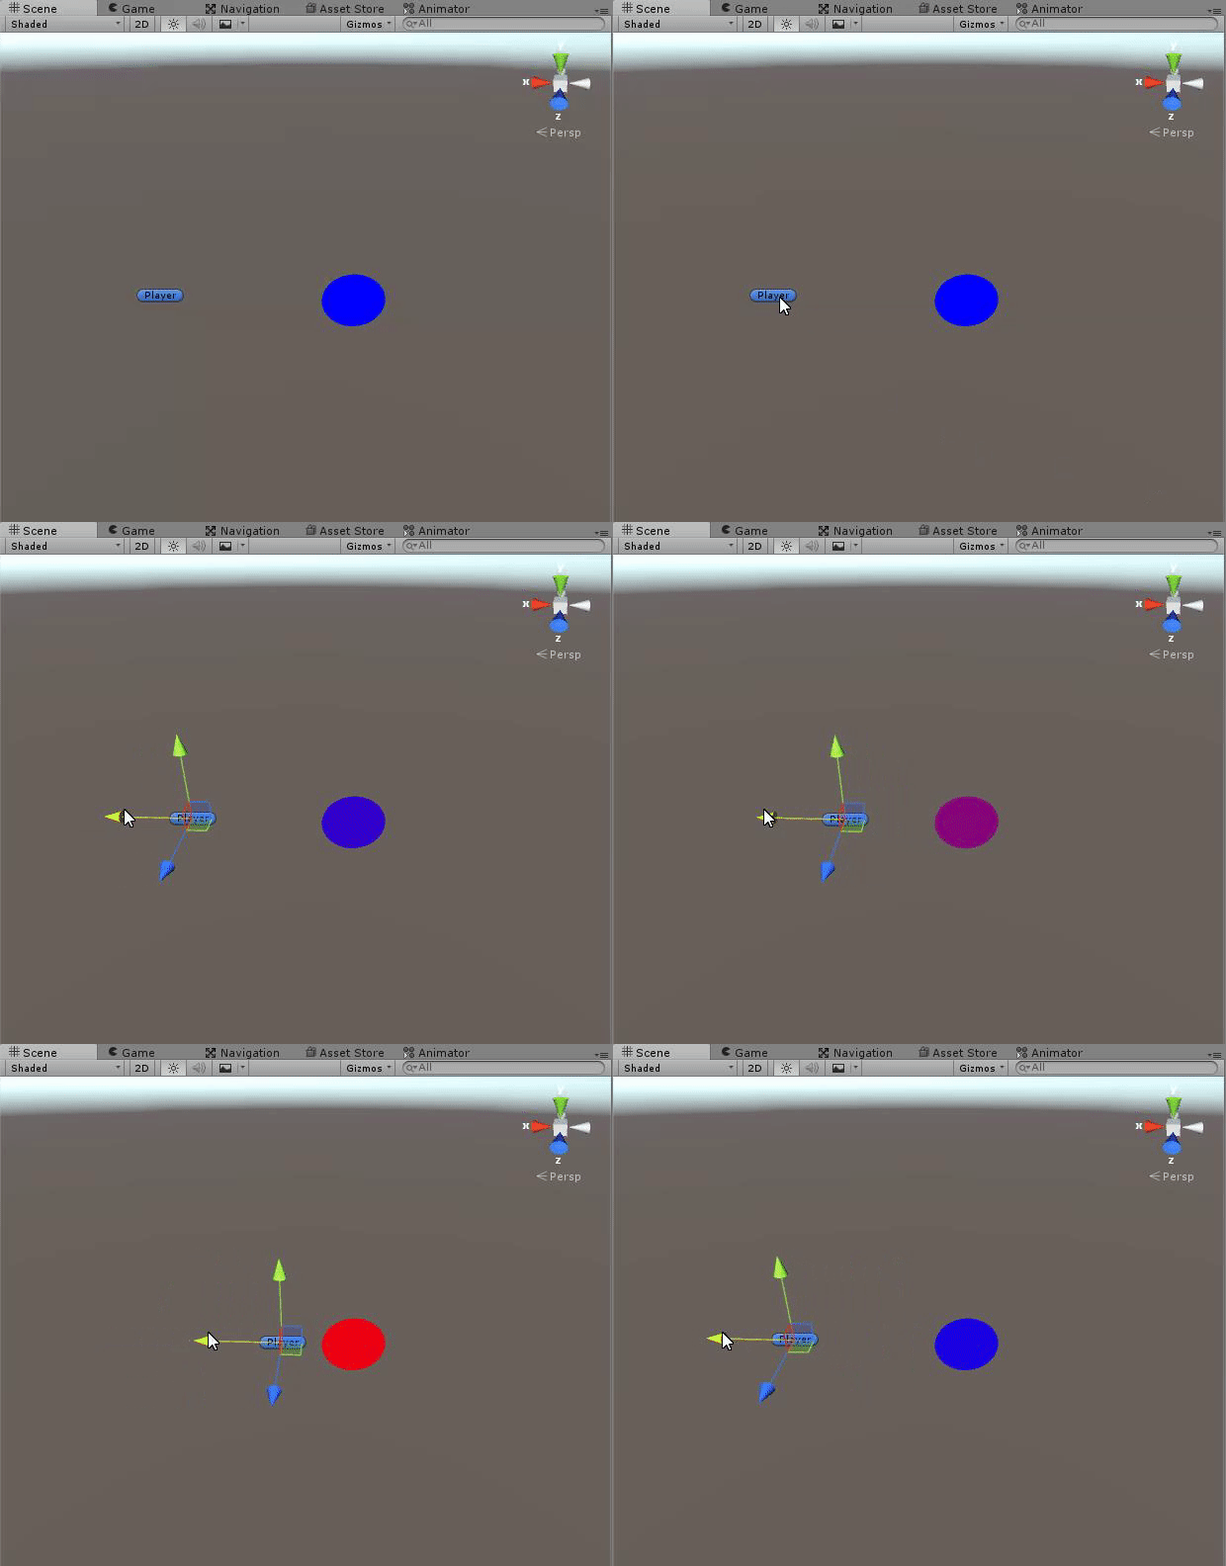
A simple example of this function working is… let’s say we want to change the color of the ball depending on player’s distance from it. s would be our current distance from the ball. a1 – minimum observed distance, a2 – maximum observed distance. So we want the ball to be blue if the distance is more than 3 meters and red if player is 1 meter away or less. everything in between would be automatically purple -ish. So the implementation with MapRange would look like this:
float distance = Vector3.Distance(ball.transform.position, player.transform.position);
float t = MapRange(distance, 1f, 3f, 0f, 1f);
ball.transform.GetComponent<SpriteRenderer>().color = Color.Lerp(Color.red, Color.blue, t);
Back to the drone leaning…
so in case of movement leaning, exploiting MapRange() would be this simple:
void PitchCtrl()
{
    transform.GetChild(0).eulerAngles = new Vector3(
        MapRange(agent.velocity.magnitude, 0f, 2f, 0f, 20f),
        transform.eulerAngles.y,
        transform.eulerAngles.z
        );
}
Add PitchCtrl() to the update function and you’re good. The drone will lean forward while moving.
Shadow
Let’s add a shadow to the drone. A simple static shadow. That’s a piece of cake since we just have to add a sprite to the existing hierarchy. Make sure your shadow object is the second child of “Drone”. Just like that:
Line renderer
In order to setup a line renderer we should add a sprite, but don’t worry, there’s no need to import one, just head over to your project window and open the folder where you store your sprites. Hit Right click > Create > Sprites > Square. You’ve got your new sprite which we’ll use for the new material that we’re about to create.
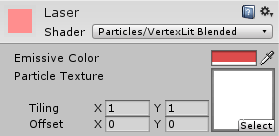
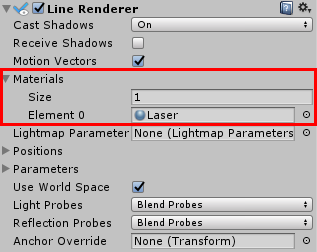
Right click > Create > Material. Material’s shader should be changed to Particles > VertexLit Blend and Particle Texture to the earlier created Square sprite. Sounds hectic, but just look at this picture and you’ll get it:
Create a new script. Let’s say the name of this script is Goal. Attach the Goal script to our Ring object.
Also attach line renderer component to the “Ring”. Line renderer would require a material, so please add the material we just created to it.
So, it’s time to write the code, which is also very simple. Here the whole Goal script code and it’s pretty much self-explanatory:
public class Goal : MonoBehaviour {

    LineRenderer line;

	void Start () {
            line = GetComponent<LineRenderer>();
            line.SetWidth(.05f, .05f);
	}

	void Update () {
            //current ring position
            line.SetPosition(0, transform.parent.position);
            //respective ring position on the ground
            line.SetPosition(1, new Vector3(transform.parent.position.x, 0, transform.parent.position.z));
	}
}
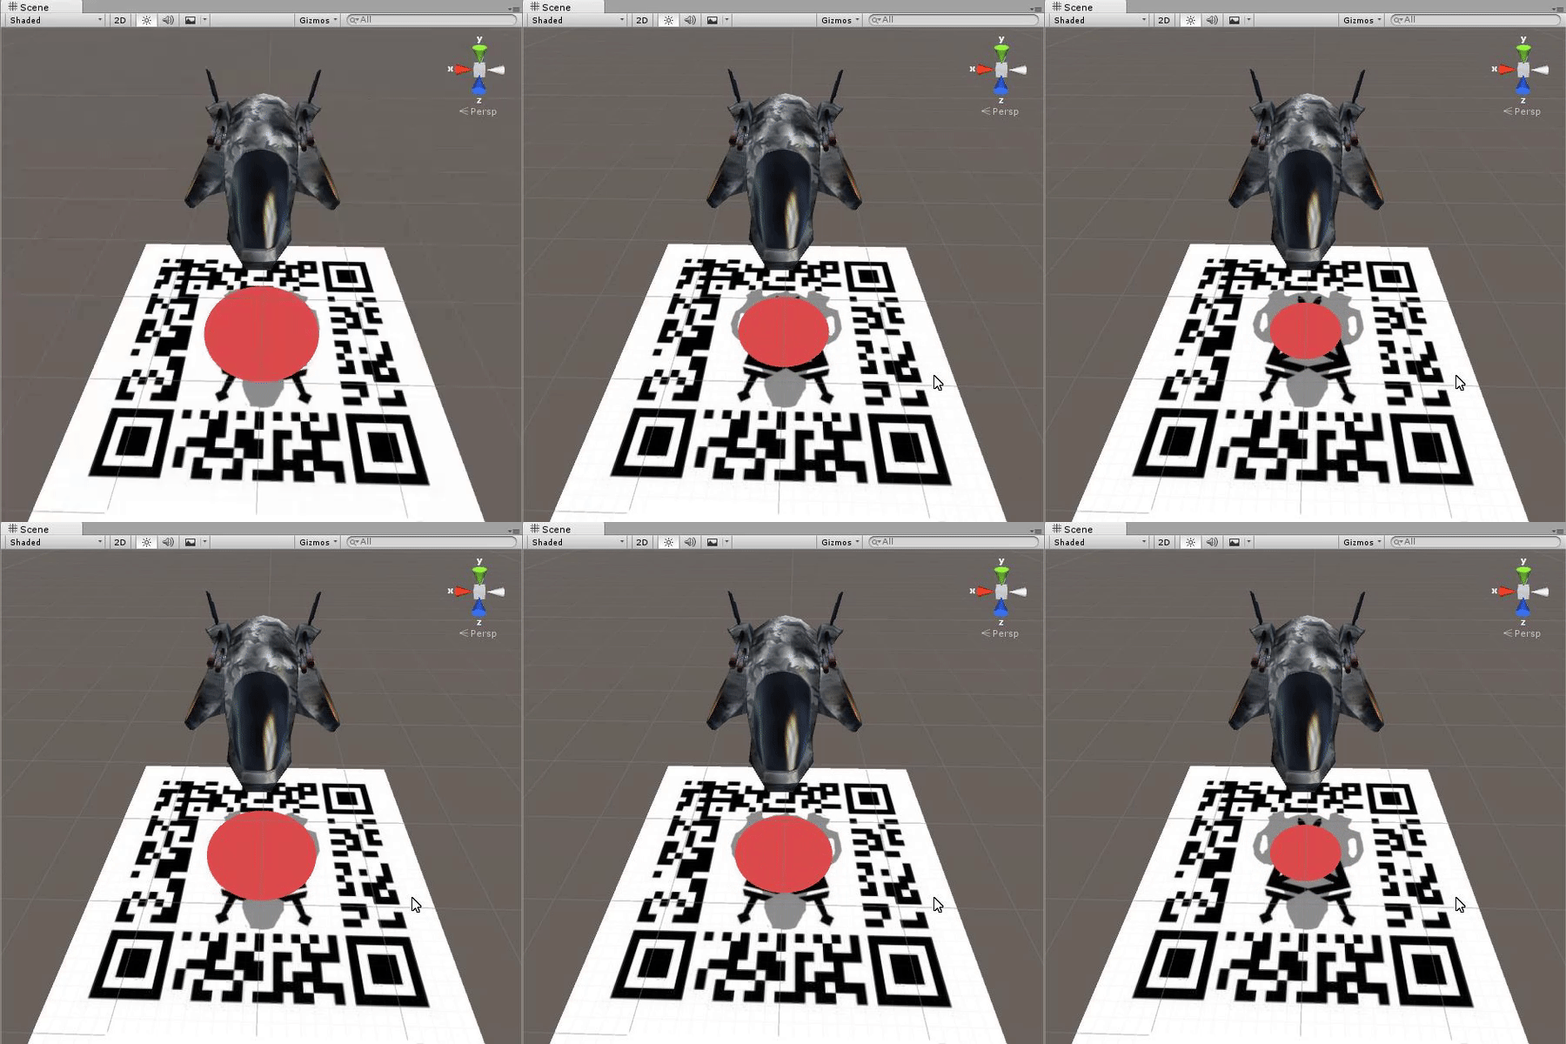
If you run the app now, you’ll see the ring’s line/laser pointing to the drone destination. It’s great but we can also make this destination look a little bit more clear by adding another object… Just a game object containing a Sprite Renderer and Animation components.
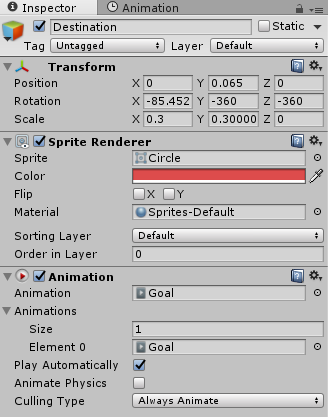 |
 |
|---|
Create a public variable destSprite and update MoveToTarget() function.
void MoveToTarget()
{
    if (markerGoal.active)
    {
	parentPos = markerGoal.transform.parent.position;
        agent.SetDestination(parentPos);
        destSprite.transform.position = new Vector3(parentPos.x, 0, parentPos.z);
    }
}
That’s it, run your project on a smartphone and you’ll have the same result as in this video:
Thanks for reading and don’t forget to subscribe to our newsletter not to miss any of the new Unity development blog posts!

