Welcome back to our GameSparks tutorial. In this final part we’ll set up the Game scene and implement the gameplay. You can find part one, two and three on our blog if you haven’t read them yet.
Gameplay
Before we start implementing the gameplay itself, we need a class that will help us process incoming Challenge messages and store any needed Challenge variables. That way we don’t have to duplicate the same code in each class that needs them. Let’s call it ChallengeManager and make it a Singleton. Add four UnityEvents to it, representing all Challenge messages that other classes could be interested in.
public class ChallengeManager : Singleton<ChallengeManager>
{
    public UnityEvent ChallengeStarted;
    public UnityEvent ChallengeTurnTaken;
    public UnityEvent ChallengeWon;
    public UnityEvent ChallengeLost;
}
Create a new script called PieceType. It will be an enum representing piece type values on the board (0, 1, 2).
public enum PieceType
{
    Empty,
    Heart,
    Skull
}
Go back to the ChallengeManager script. Now we can add some public properties and give them values in the message handlers, to make sure they are always up to date.
public class ChallengeManager : Singleton<ChallengeManager>
{

    // …

    private string challengeID;

    void Start()
    {
        ChallengeStartedMessage.Listener += OnChallengeStarted;
        ChallengeTurnTakenMessage.Listener += OnChallengeTurnTaken;
        ChallengeWonMessage.Listener += OnChallengeWon;
        ChallengeLostMessage.Listener += OnChallengeLost;
    }

    public bool IsChallengeActive { get; private set; }

    public string HeartsPlayerName { get; private set; }

    public string HeartsPlayerId { get; private set; }

    public string SkullsPlayerName { get; private set; }

    public string SkullsPlayerId { get; private set; }

    public string CurrentPlayerName { get; private set; }

    public PieceType CurrentPlayerPieceType
    {
        get
        {
            if (IsChallengeActive)
            {
                return CurrentPlayerName == HeartsPlayerName ? PieceType.Heart : PieceType.Skull;
            }
            else
            {
                return PieceType.Empty;
            }
        }
    }

    public PieceType[] Fields { get; private set; }

    private void OnChallengeStarted(ChallengeStartedMessage message)
    {
        IsChallengeActive = true;
        challengeID = message.Challenge.ChallengeId;
        HeartsPlayerName = message.Challenge.Challenger.Name;
        HeartsPlayerId = message.Challenge.Challenger.Id;
        SkullsPlayerName = message.Challenge.Challenged.First().Name;
        SkullsPlayerId = message.Challenge.Challenged.First().Id;
        CurrentPlayerName = message.Challenge.NextPlayer == HeartsPlayerId ? HeartsPlayerName : SkullsPlayerName;
        Fields = message.Challenge.ScriptData.GetIntList("fields").Cast<PieceType>().ToArray();
        ChallengeStarted.Invoke();
    }

    private void OnChallengeTurnTaken(ChallengeTurnTakenMessage message)
    {
        CurrentPlayerName = message.Challenge.NextPlayer == HeartsPlayerId ? HeartsPlayerName : SkullsPlayerName;
        Fields = message.Challenge.ScriptData.GetIntList("fields").Cast<PieceType>().ToArray();
        ChallengeTurnTaken.Invoke();
    }

    private void OnChallengeWon(ChallengeWonMessage message)
    {
        IsChallengeActive = false;
        ChallengeWon.Invoke();
    }

    private void OnChallengeLost(ChallengeLostMessage message)
    {
        IsChallengeActive = false;
        ChallengeLost.Invoke();
    }
}
Add one more method – Move – to make sure that other gameplay classes won’t be referencing GameSparks and won’t need to know how to communicate with the backend directly.
public class ChallengeManager : Singleton<ChallengeManager>
{

    // …

    public void Move(int x, int y)
    {
        LogChallengeEventRequest request = new LogChallengeEventRequest();
        request.SetChallengeInstanceId(challengeID);
        request.SetEventKey("Move");
        request.SetEventAttribute("X", x);
        request.SetEventAttribute("Y", y);
        request.Send(OnMoveSuccess, OnMoveError);
    }

    private void OnMoveSuccess(LogChallengeEventResponse response)
    {
        print(response.JSONString);
    }

    private void OnMoveError(LogChallengeEventResponse response)
    {
        print(response.Errors.JSON.ToString());
    }

    // …

}
Create a new script called Field. Leave it empty for now. Create a second new script and call it Board. Board’s only responsibility is to spawn fields from a prefab and initialize them with their coordinates. Add BoardSize constant, fieldPrefab and fieldSize fields to the Board.
public class Board : MonoBehaviour
{
    public const int BoardSize = 15;

    [SerializeField]
    private Field fieldPrefab;
    [SerializeField]
    private float fieldSpacing = 0.25f;
}
Now add SpawnFields and SpawnField methods along with their helper, CalculateFieldPosition.
public class Board : MonoBehaviour
{

    // …

    void Awake()
    {
        SpawnFields();
    }

    private void SpawnFields()
    {
        for (int x = 0; x < BoardSize; x++)
        {
            for (int y = 0; y < BoardSize; y++)
            {
                SpawnField(x, y);
            }
        }
    }

    private void SpawnField(int x, int y)
    {
        Vector3 position = CalculateFieldPosition(x, y);
        Field field = Instantiate(fieldPrefab, position, Quaternion.identity, transform);
        field.Initialize(x, y);
    }

    private Vector3 CalculateFieldPosition(int x, int y)
    {
        float offset = -fieldSpacing * (BoardSize - 1) / 2.0f;
        return new Vector3(x * fieldSpacing + offset, y * fieldSpacing + offset, 0.0f);
    }
}
Don’t worry about the compilation errors yet, as we still have to implement Field.Initialize method.
Create a new, empty game object. Call it Board. Add Board component to it and create a prefab.
Create another empty game object. Call it Field. Add Field component to it and create a prefab. Make sure to remove Field prefab instance from the scene. Assign a reference to the Field prefab in the Board prefab.
Go to the Field script now. Its responsibility will be to handle the mouse input when a player interacts with a field and to manage its state based on this input. We’ll use Animator to store Field’s state.
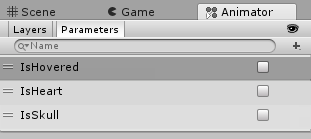
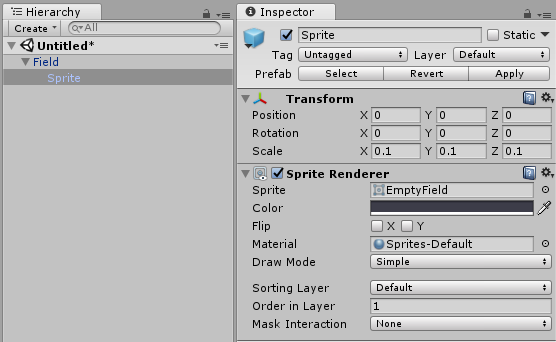
Add a child game object to the Field prefab and add a SpriteRenderer component to it. Add Animator and BoxCollider2D components to the Field prefab root game object. Create a new AnimatorController asset, assign a reference to it in Field’s Animator. Start editing your new AnimatorController in the Animator window. Add three bool parameters, as shown in the image below:
Create states and transitions according to the images below:
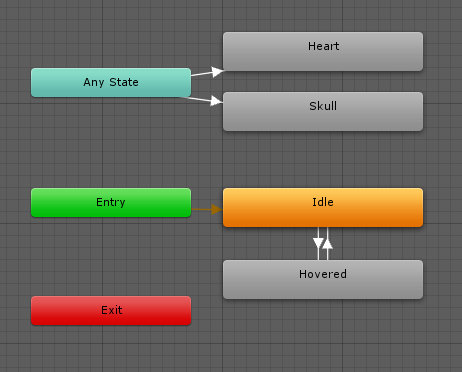
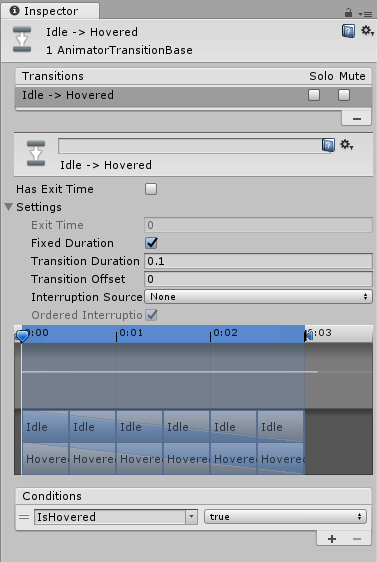
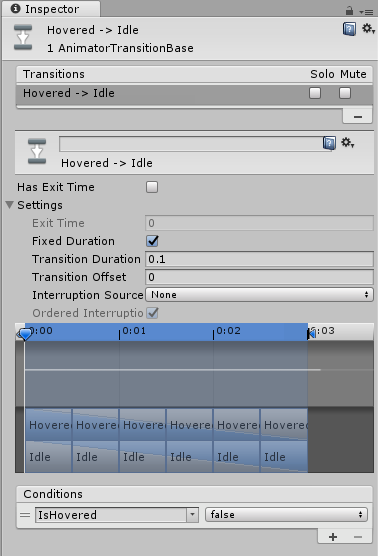
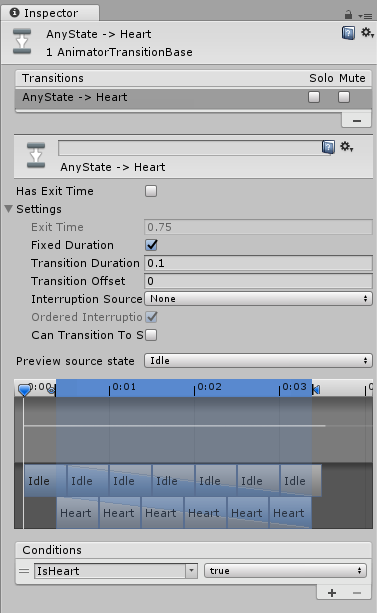
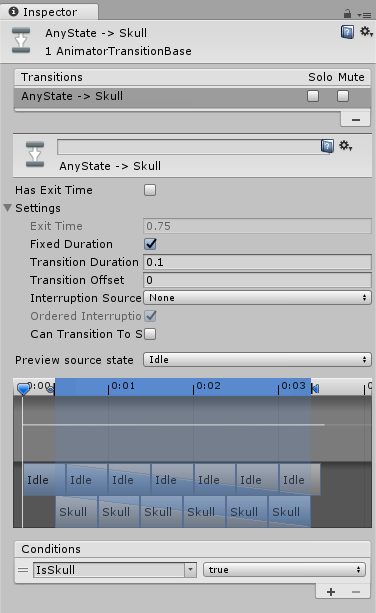
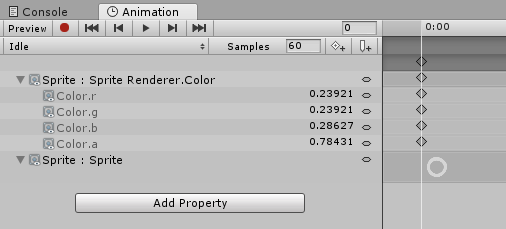
Create four, one frame snapshot animations for the Field prefab. We’ll use transitions to do the tweening hard work for us. Make sure your prefab is set up as on the image below.
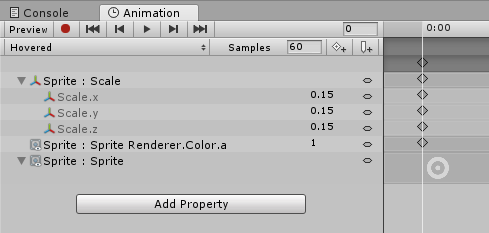
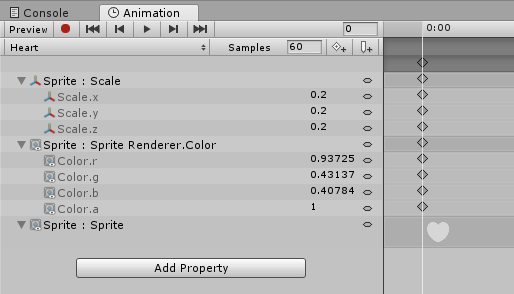
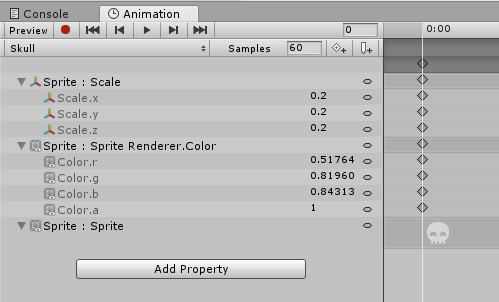
Paste in the following code to the Field script:
public class Field : MonoBehaviour
{
    private const string IsHoveredAnimatorParameterName = "IsHovered";
    private const string IsHeartAnimatorParameterName = "IsHeart";
    private const string IsSkullAnimatorParameterName = "IsSkull";

    private Animator animator;
    private int x;
    private int y;

    void Awake()
    {
        animator = GetComponent<Animator>();
        ChallengeManager.Instance.ChallengeTurnTaken.AddListener(OnChallengeTurnTaken);
    }

    void OnMouseDown()
    {
        ChallengeManager.Instance.Move(x, y);
    }

    void OnMouseEnter()
    {
        animator.SetBool(IsHoveredAnimatorParameterName, true);
    }

    void OnMouseExit()
    {
        animator.SetBool(IsHoveredAnimatorParameterName, false);
    }

    public void Initialize(int x, int y)
    {
        this.x = x;
        this.y = y;
    }

    private void OnChallengeTurnTaken()
    {
        UpdatePiece();
    }

    private void UpdatePiece()
    {
        int fieldIndex = x + y * Board.BoardSize;
        PieceType pieceType = ChallengeManager.Instance.Fields[fieldIndex];
        if (pieceType == PieceType.Heart)
        {
            animator.SetBool(IsHeartAnimatorParameterName, true);
        }
        else if (pieceType == PieceType.Skull)
        {
            animator.SetBool(IsSkullAnimatorParameterName, true);
        }
    }
}
One last thing left to make our gameplay complete is a win screen. Create a new script called WinLossPanel. Create a new game object on the Canvas and add a WinLossPanel component to it. Add two Texts (win and loss message) and a Button (back) to it. Make sure to save it as a prefab.
Paste in the following code and assign references to the UI elements in the prefab:
public class WinLossPanel : MonoBehaviour
{
    [SerializeField]
    private RectTransform content;
    [SerializeField]
    private Text winText;
    [SerializeField]
    private Text lossText;
    [SerializeField]
    private Button backButton;

    void Awake()
    {
        ChallengeManager.Instance.ChallengeWon.AddListener(OnChallengeWon);
        ChallengeManager.Instance.ChallengeLost.AddListener(OnChallengeLost);
        backButton.onClick.AddListener(OnBackButtonClick);
        Hide();
    }

    private void Show()
    {
        content.gameObject.SetActive(true);
    }

    private void Hide()
    {
        content.gameObject.SetActive(false);
    }

    private void OnChallengeWon()
    {
        winText.enabled = true;
        lossText.enabled = false;
        Show();
    }

    private void OnChallengeLost()
    {
        winText.enabled = false;
        lossText.enabled = true;
        Show();
    }

    private void OnBackButtonClick()
    {
        LoadingManager.Instance.LoadPreviousScene();
    }
}
Most of it is pretty straightforward. You just have to remember that there are two separate Challenge events, sent to the winner and the loser.
Other Effects
We won’t cover any additional visual effects here like particles or animated usernames. To see how they were done, download the complete Unity project.
Summary
In a fairly short time we have created a fully functional, server authoritative, multiplayer game. Of course many things could be added, for example:
- More complicated, tournament rules of Gomoku.
- Handling disconnected users or allowing users to play multiple games at a time asynchronously.
Try to think of one simple feature you would like to add to the game and implement it as your assignment. This is one of the best ways to learn once you understand the basics of the subject. Don’t forget to share your ideas with us in the comments or on our Facebook page.
