In the last part of the series we’re going to build a real example of a REST API Interface using Unity’s Coroutines as an internal web requests tool and Promises as an encapsulation layer. We’re going to use the fake REST API service available for everyone to test their services on. It’s a simple API that implements the classic user to-do lists, posts & comments section as well as the album & photos scenario. Very useful if you’re building your own front-end but don’t have your own running server just yet.
NOTE: This tutorial is a bit more advanced and it won’t teach you REST backend theory or JSON serialization. It also assumes you’re already familiar with the RSG Promises we’ve covered in Part 2.
The project
Our project is going to be based around the user to-do lists. The main feature is simple: it’ll take a username as input and provide a list of tasks associated with that user. The application is going to get a list of all the users, find the searched username in it and if that user exists it will then grab all the tasks. Ideally you’d want the user searching to be done server-side, but for the sake of this example let’s say someone hadn’t thought it through and left you to do your job.
For JSON deserialization we’re using the popular JSON .NET framework. If your project is going to be cross-platform you should take a look at JSON.NET for Unity, which uses the same namespace and structure so it can easily be used as a drop-in replacement.
We’re going to work with Unity 5.4.0f3. You can download the .unitypackage here with a complete project and all the necessary plugins. Let’s dive into it.
The project features a Plugins directory, Scenes directory with the single example scene as well as Scripts directory, where the whole codebase sits. The code is structured as follows:
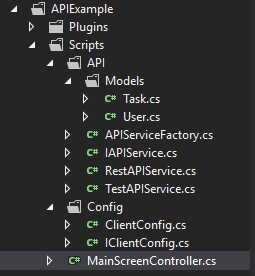
Let’s start from the top.
The Models
The Models directory is where the data models’ classes are. They’re essentially the classes with properties mapped to JSON object keys. For example our JSON of a single Task object looks like this:
{
    "userId": 1,
    "id": 1,
    "title": "delectus aut autem",
    "completed": false
}
The associated Model class is then being implemented in the following way:
using Newtonsoft.Json;
namespace APIExample.API.Models
{
    public class User
    {
        [JsonProperty("id")]
        public int Id { get; set; }

        [JsonProperty("name")]
        public string Name { get; set; }

        [JsonProperty("username")]
        public string Username { get; set; }
    }
}
As you can see, JSON .NET allows for an extremely easy mapping using the JsonProperty attribute. Actually, you can skip these entirely if the property name matches the JSON key. Personally I prefer camelCase in my JSONs and PascalCase in my properties. Keep in mind that for AOT platforms you should use JSON .NET for Unity or use regular fields. Refer to the documentation for more information.
The User model is a stripped model as the jsonplaceholder returns a much bigger JSON, but for the purpose of this example we will not implement all the properties.
Promises as a service interface
Let’s say you’re working on a REST API for a month only to find out that management of your company decided to move to Websocket. Or perhaps you’re ahead of your backend department and want to test new features on your own without the need of using a real server. To remedy this it’s a good idea to implement the Factory pattern which let you choose the exact implementation of your service (APIServiceFactory) by encapsulating a common interface for all of them (IAPIService). The interface is using Promises as the abstraction layer so it’s very easy to use.
To search users and list their tasks we only need two functions:
using System.Collections.Generic;
using APIExample.API.Models;
using RSG;

namespace APIExample.API
{
    /// <summary>
    /// Represents a higher level idea of an API service.
    /// </summary>
    public interface IAPIService
    {
        /// <summary>
        /// Finds user via the API.
        /// </summary>
        /// <param name="username">Username of searched user</param>
        /// <returns>User model instance</returns>
        IPromise<User> FindUser(string username);

        /// <summary>
        /// Gets all the user's tasks from the API.
        /// </summary>
        /// <param name="username">Id of user</param>
        /// <returns>Collection of all tasks associated with user</returns>
        IPromise<IEnumerable<Task>> GetUserTasks(int userId);
    }
}
If you’re going to need another API implementation in the future all you have to do is create a new class that will implement these two methods. The instantiation is done via the factory and the provided config (IClientConfig and ClientConfig):
using APIExample.Config;
using UnityEngine;

namespace APIExample.API
{
    public class APIServiceFactory
    {
        /// <summary>
        /// Creates API service based on provided config.
        /// </summary>
        /// <param name="config">IClientConfig implementation</param>
        /// <returns>IAPIService instance</returns>
        public static IAPIService CreateAPIService(IClientConfig config)
        {
            switch (config.APIType)
            {
                case Config.API.TEST:
                    var testApi = new TestAPIService();
                    return testApi;

                case Config.API.REST:
                default:
                    var go = new GameObject("RestAPI");
                    var restApi = go.AddComponent<RestAPIService>();
                    restApi.Initialize(config.IPEndPoint);
                    return restApi;
            }
        }
    }
}
RestAPIService
The REST API implementation uses the Unity’s Coroutines and the UnityWebRequest class under the hood. Because of that, the factory creates a GameObject and attaches the RestAPIService class, which also extends the MonoBehaviour. This lets us encapsulate the coroutines even further – you’ll be able to use the service in all of the classes, because the interface deals with Promises only. For example, getting the user tasks is done like so:
public IPromise<IEnumerable<Task>> GetUserTasks(int userId)
{
    // We return a promise instantly and start the coroutine to do the real work
    var promise = new Promise<IEnumerable<Task>>();
    StartCoroutine(_GetUserTasks(promise, userId));

    return promise;
}

private IEnumerator _GetUserTasks(Promise<IEnumerable<Task>> promise, int userId)
{
    var request = UnityWebRequest.Get(apiAddress + "/todos?userId=" + userId);
    yield return request.Send();

    if (request.isError) // something went wrong
    {
        promise.Reject(new Exception(request.error));
    }
    else if (request.responseCode != 200) // or the response is not OK
    {
        promise.Reject(new Exception(request.downloadHandler.text));
    }
    else
    {
        // Format output and resolve promise
        string json = request.downloadHandler.text;
        var tasks = JsonConvert.DeserializeObject<List<Task>>(json);

        promise.Resolve(tasks);
    }
}
Notice how easily we control the output with promise.Resolve() and promise.Reject().
TestAPIService
The test implementation is just an example of what you can do. It returns objects without any external calls, but you could also use it as a room to test your JSON deserialization without launching a real server. The bottom line is that this should be the space to mess around with no worries that you’re hard-coding some test scenarios which need to be commented out later. All you have to do is change the config to the real service and you’re done.
So for example, if you’d like to test how your tasks` UI look, but don’t have the tasks functionality done server-side just yet, simply implement the test service and the GetUserTasks() method to return a bunch of test objects:
public IPromise<IEnumerable<Task>> GetUserTasks(int userId)
{
    var promise = new Promise<IEnumerable<Task>>();
    promise.Resolve(new List<Task> {
        new Task { Id = 0, UserId = userId, Title = "Test task 1", Completed = true },
        new Task { Id = 1, UserId = userId, Title = "Test task 2", Completed = false }
    });
    return promise;
}
Notice that you can resolve promises instantly when needed.
The result
The payoff is the example test scene and the MainScreenController class which utilizes the interface. First, it initializes the service using the Factory:
clientConfig = new ClientConfig
{
    APIType = Config.API.REST,
    IPEndPoint = "http://jsonplaceholder.typicode.com"
};

apiService = APIServiceFactory.CreateAPIService(clientConfig);
As mentioned earlier, changing to Test implementation is as simple as swapping that APIType property in the config. The UI consists of a single input field where you type in the username and a button to get all the user tasks. Using the common interface it couldn’t be any simpler:
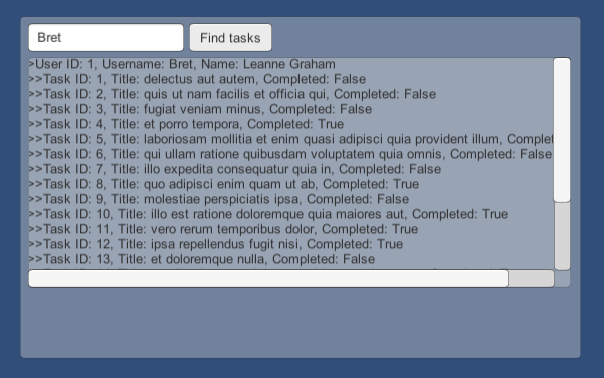
private void FindUserTasks(string username)
{
    resultArea.text = "";
    status.text = "";

    apiService.FindUser(username)
    .Then(user =>
    {
        resultArea.text += string.Format(">User ID: {0}, Username: {1}, Name: {2}\n", user.Id, user.Username, user.Name);
        return apiService.GetUserTasks(user.Id);
    })
    .Then(tasks =>
    {
        foreach (var task in tasks)
        {
            resultArea.text += string.Format(">>Task ID: {0}, Title: {1}, Completed: {2}\n", task.Id, task.Title, task.Completed);
        }
    })
    .Catch(error =>
    {
        status.text = string.Format("Error: {0}", error.Message);
    });
}
Summary
And at last we come to an end of the series. Again, the final project can be downloaded as the .unitypackage here. In conclusion Promises prove to be a great way to abstract your code from Unity specific Coroutines. They can also be used in many different cases and are an elegant way to create clean interfaces. We hope you’ll enjoy them as much as we do. If you have any questions about the series or the example project, feel free to leave a comment in the section below.